There are about 8 months from spring ’till fall in southeastern USA where the grass grows at an ever increasing rate, eventually outpacing even the most avid outdoorsman’s desire to jump on a lawn mower.
This simple fact, combined with both a rapid fall of hardware component prices and a steady refining of history altering open-source autopilot stacks, means that many passerby have begun seeing sights previously uncommon to man.
Exhibit A:
In this blog post we’ll introduce the main components of our mowing rig. In future posts — hopefully not 2 years from now 🙂 — we’ll try to flesh out some more system details. As always, feel free to post questions in the comments and I’ll try to address anything I haven’t explained well.
The Pursuit of the Perfect RTK GNSS System
As we’ve previously discussed, for several years the long $$ poll in the hardware tent hamstringing our autonomous mower dreams has been centimeter-level robust GNSS gear1.
2 years ago we marveled that ComNav had built a precision GNSS module for ~$1000 USD capable of positioning to within 1cm at 10hz (i.e. 10 readings per second — or a new position output every 0.1 seconds). Our excitement was justified because the big agriculture/surveying GNSS vendors were concurrently exacting perhaps 5-10x that price for similar technology.
It is with considerable excitement we report that now in 2019, your affordable autonomous field-navigation robot dreams are more approachable than ever.
The reason for this, of course, is largely the gift that u-blox has recently introduced to mankind: the ZED-F9P L1/L2/L5 GNSS module.
If you live thousands of miles away from Switzerland like me, then you may also shamefully admit that your knowledge of that beautiful country has hitherto been effectively limited to the following:
- The Alps
- Remarkable banking
- Swiss Army knives
Well sister, get ready to add a 4th item to that list:
![]()
Who are u-blox and why do they matter?
u-blox is a Swiss publicly traded, highly profitable, growing, financially healthy, dividend paying fabless chip designer that is quietly introducing a line of low-cost ultra high precision GNSS modules that will likely change the entire world2.
Over the past 20 years, u-blox has been developing an ever improving line of high performance GNSS receivers that have become the de facto standard GNSS component in several important markets.
If you’re not very familiar with the world of drones here’s a way to think the place u-blox occupies in that market:

u-blox really is that dominant as the provider for drone GNSS receivers, and it’s reasonable to speculate that they’ll soon provide the high precision GNSS modules onboard a big percentage of the ~70 million automobiles annually sold worldwide.
Many more glowing words could be accurately penned about u-blox, but our task at hand involves using their ZED-F9P high precision GNSS module as the position solution for an autonomous mower.
So what’s the big deal with the ZED-F9P?
In laymen’s terms, the ZED-F9P allows any outdoor thing to know it’s exact position on the face of the earth to within ~1cm with up to 20 position updates per second at a price-point that’s an order of magnitude lower than similarly robust incumbent solutions.
It does this for a flat one-time price of ~$500 USD. That price is for 2 ZED-F9P modules (along with 2 antennas) to build a stand-alone system (i.e. one of the ZED-F9P modules is set up as a Base Station / “correction” provider). If you have an existing correction source, then you’ll only need to purchase one module, and so your cost is halved to ~$250 USD.
The fine citizens of Precision Ag / Land Surveying world, arriving at this page and reading the ZED-F9P specs and pricing, will likely have a visceral appreciation for the u-blox accomplishment that perhaps few others can fully understand7.
For $500 you can purchase a 2 receiver / 2 antenna (a capable active patch antenna is included in the dev kit) L1/L2/L5 multi-constellation 20hz system that’s comparable in performance (and arguably much more approachable in terms of ease-of-integration) to a $10,000 system from one of the existing old school RTK manufacturers.
Readers familiar with RTK technology jargon may be interested in a flyover of the ZED-F9P’s technical specs:
ZED-F9P Technical Highlights
Price: ~$250 USD3
Multi-Constellation: GPS / GLONASS / Galileo / BeiDou — In other words, it’s processing position signals from satellites from all 4 of the major GNSS constellations.
Multi-Frequency: L2OF, L2C, E1B/C, B2I, E5b, L1C/A, L1OF, B1I — This is the real kicker — historically you have only obtained multi-frequency receivers by parting with thousands (or ten-thousands) of USD dollars.
20HZ output capable: Stated differently, just to be clear, it can give you 20 unique cm-level accurate positions every second.
Well-documented and mature presence: i.e. autonomous autopilot stacks (such as the gold-standard Ardupilot) have supported u-blox gnss receivers for years4.
Supports standard RTCM corrections.
Low power consumption.
If you’re coming from the world of Precision Ag or Land Surveying and you read those specs, due to your experience with the companies that have supplied that market for 2 decades, you may be thinking “yeah but how much does The Man charge me for software un-locks for all 4 constellations, multiple frequencies, and 20HZ output?”
Answer: 0.00 USD.
Yes, the ZED-F9P comes with all those features out of the box — the only catch I know of is our shared inability to stockpile these modules and then time-travel back to 2015, making a fortune through resale.
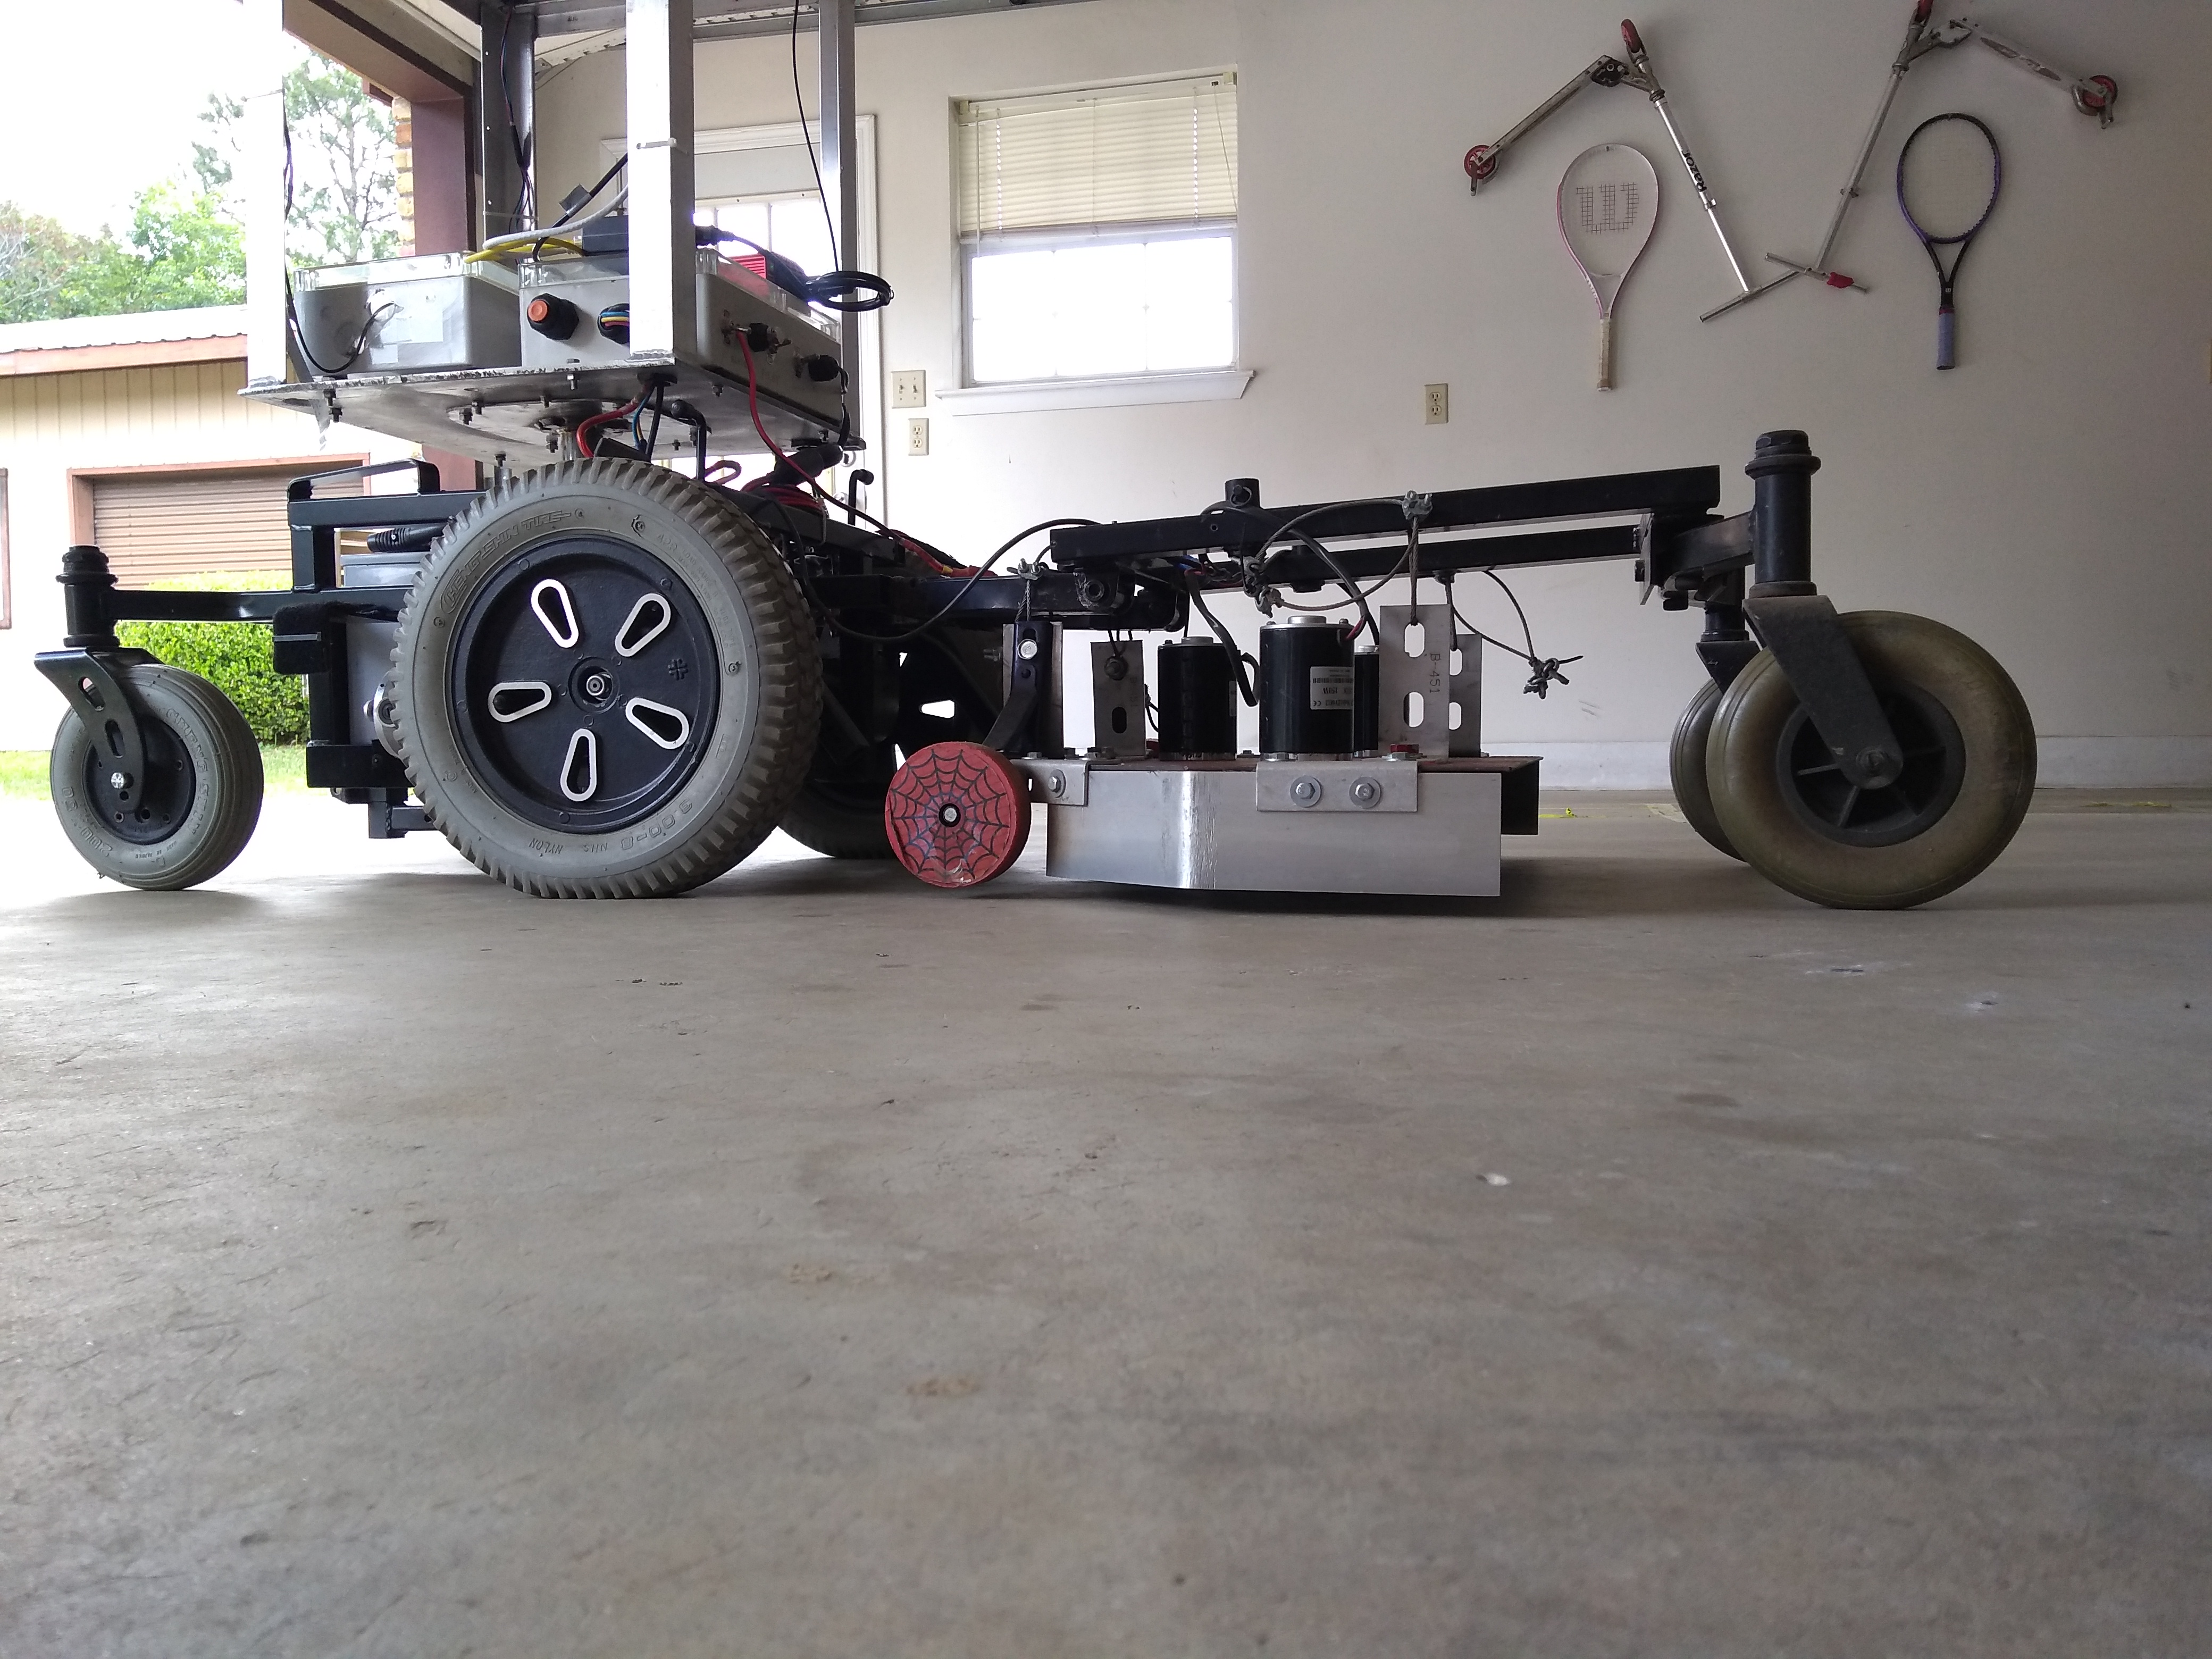
Rover Build
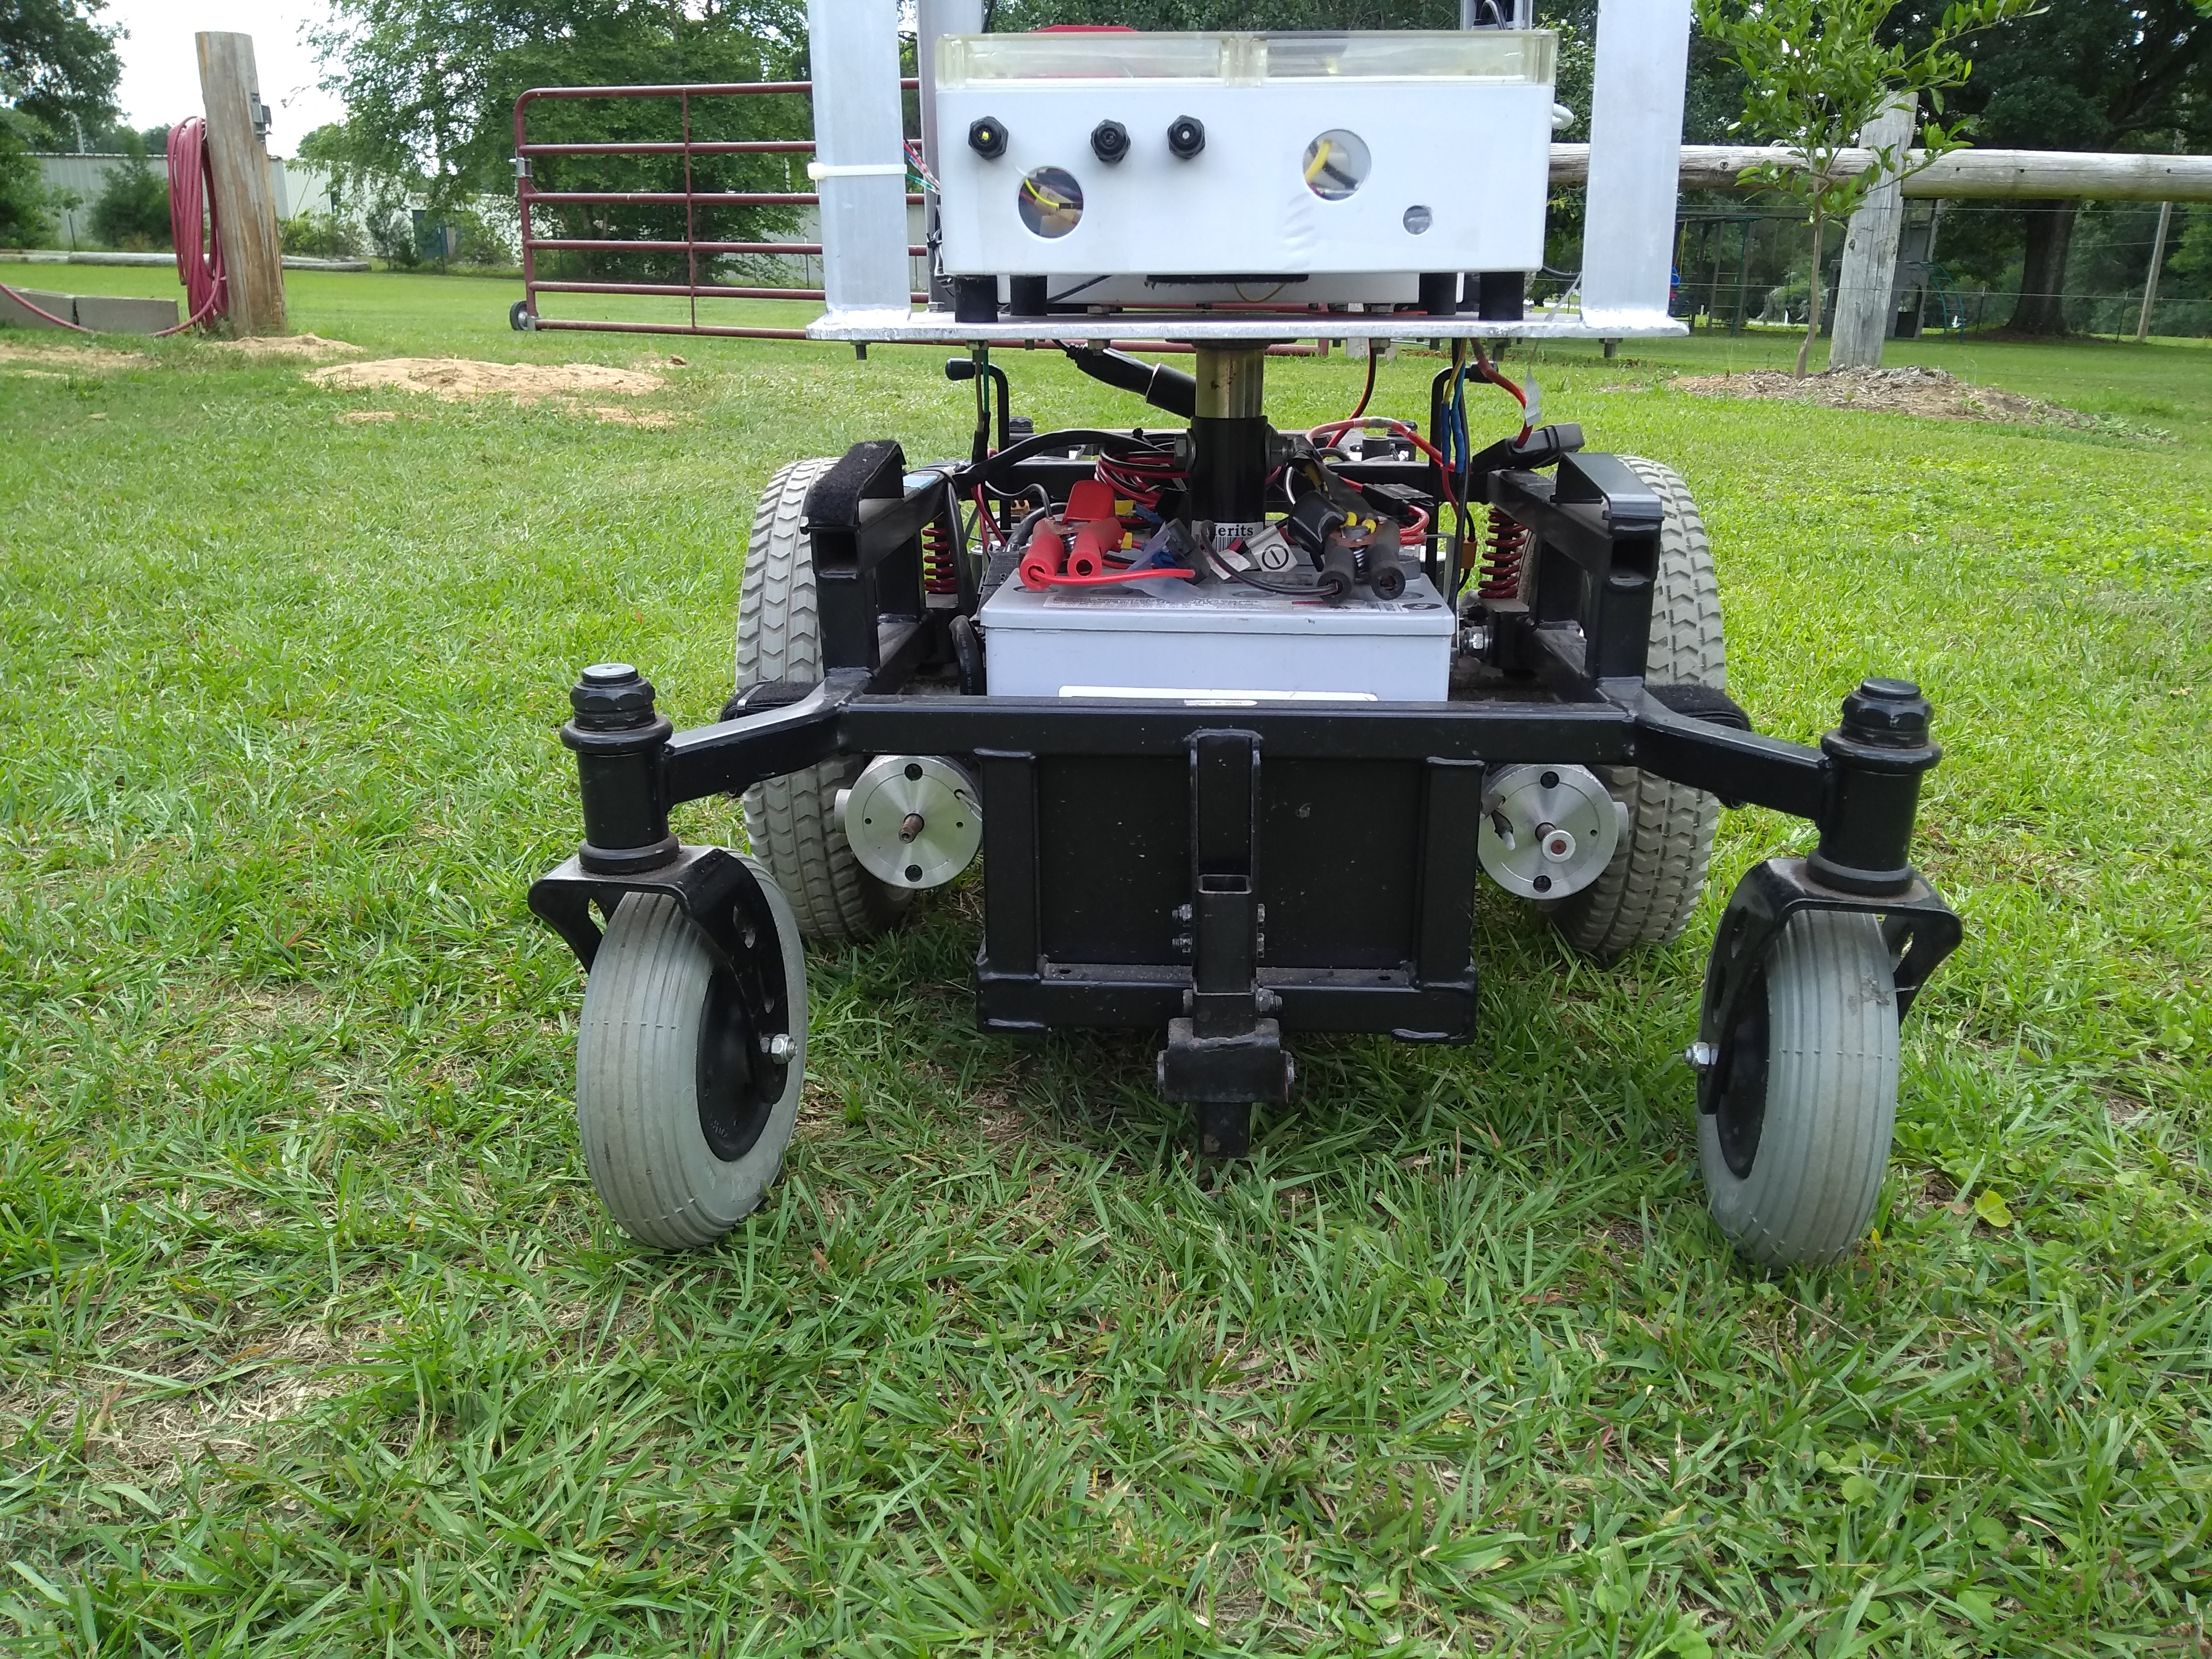
The rover we’re describing today is built on a repurposed electric wheelchair powertrain as we’ve previously detailed. But note that we’ve upgraded a few components since the previous discussion about this rover.
The significant modifications are these:
- Replace our beloved ComNav K501g with the superior u-blox ZED-F9P.
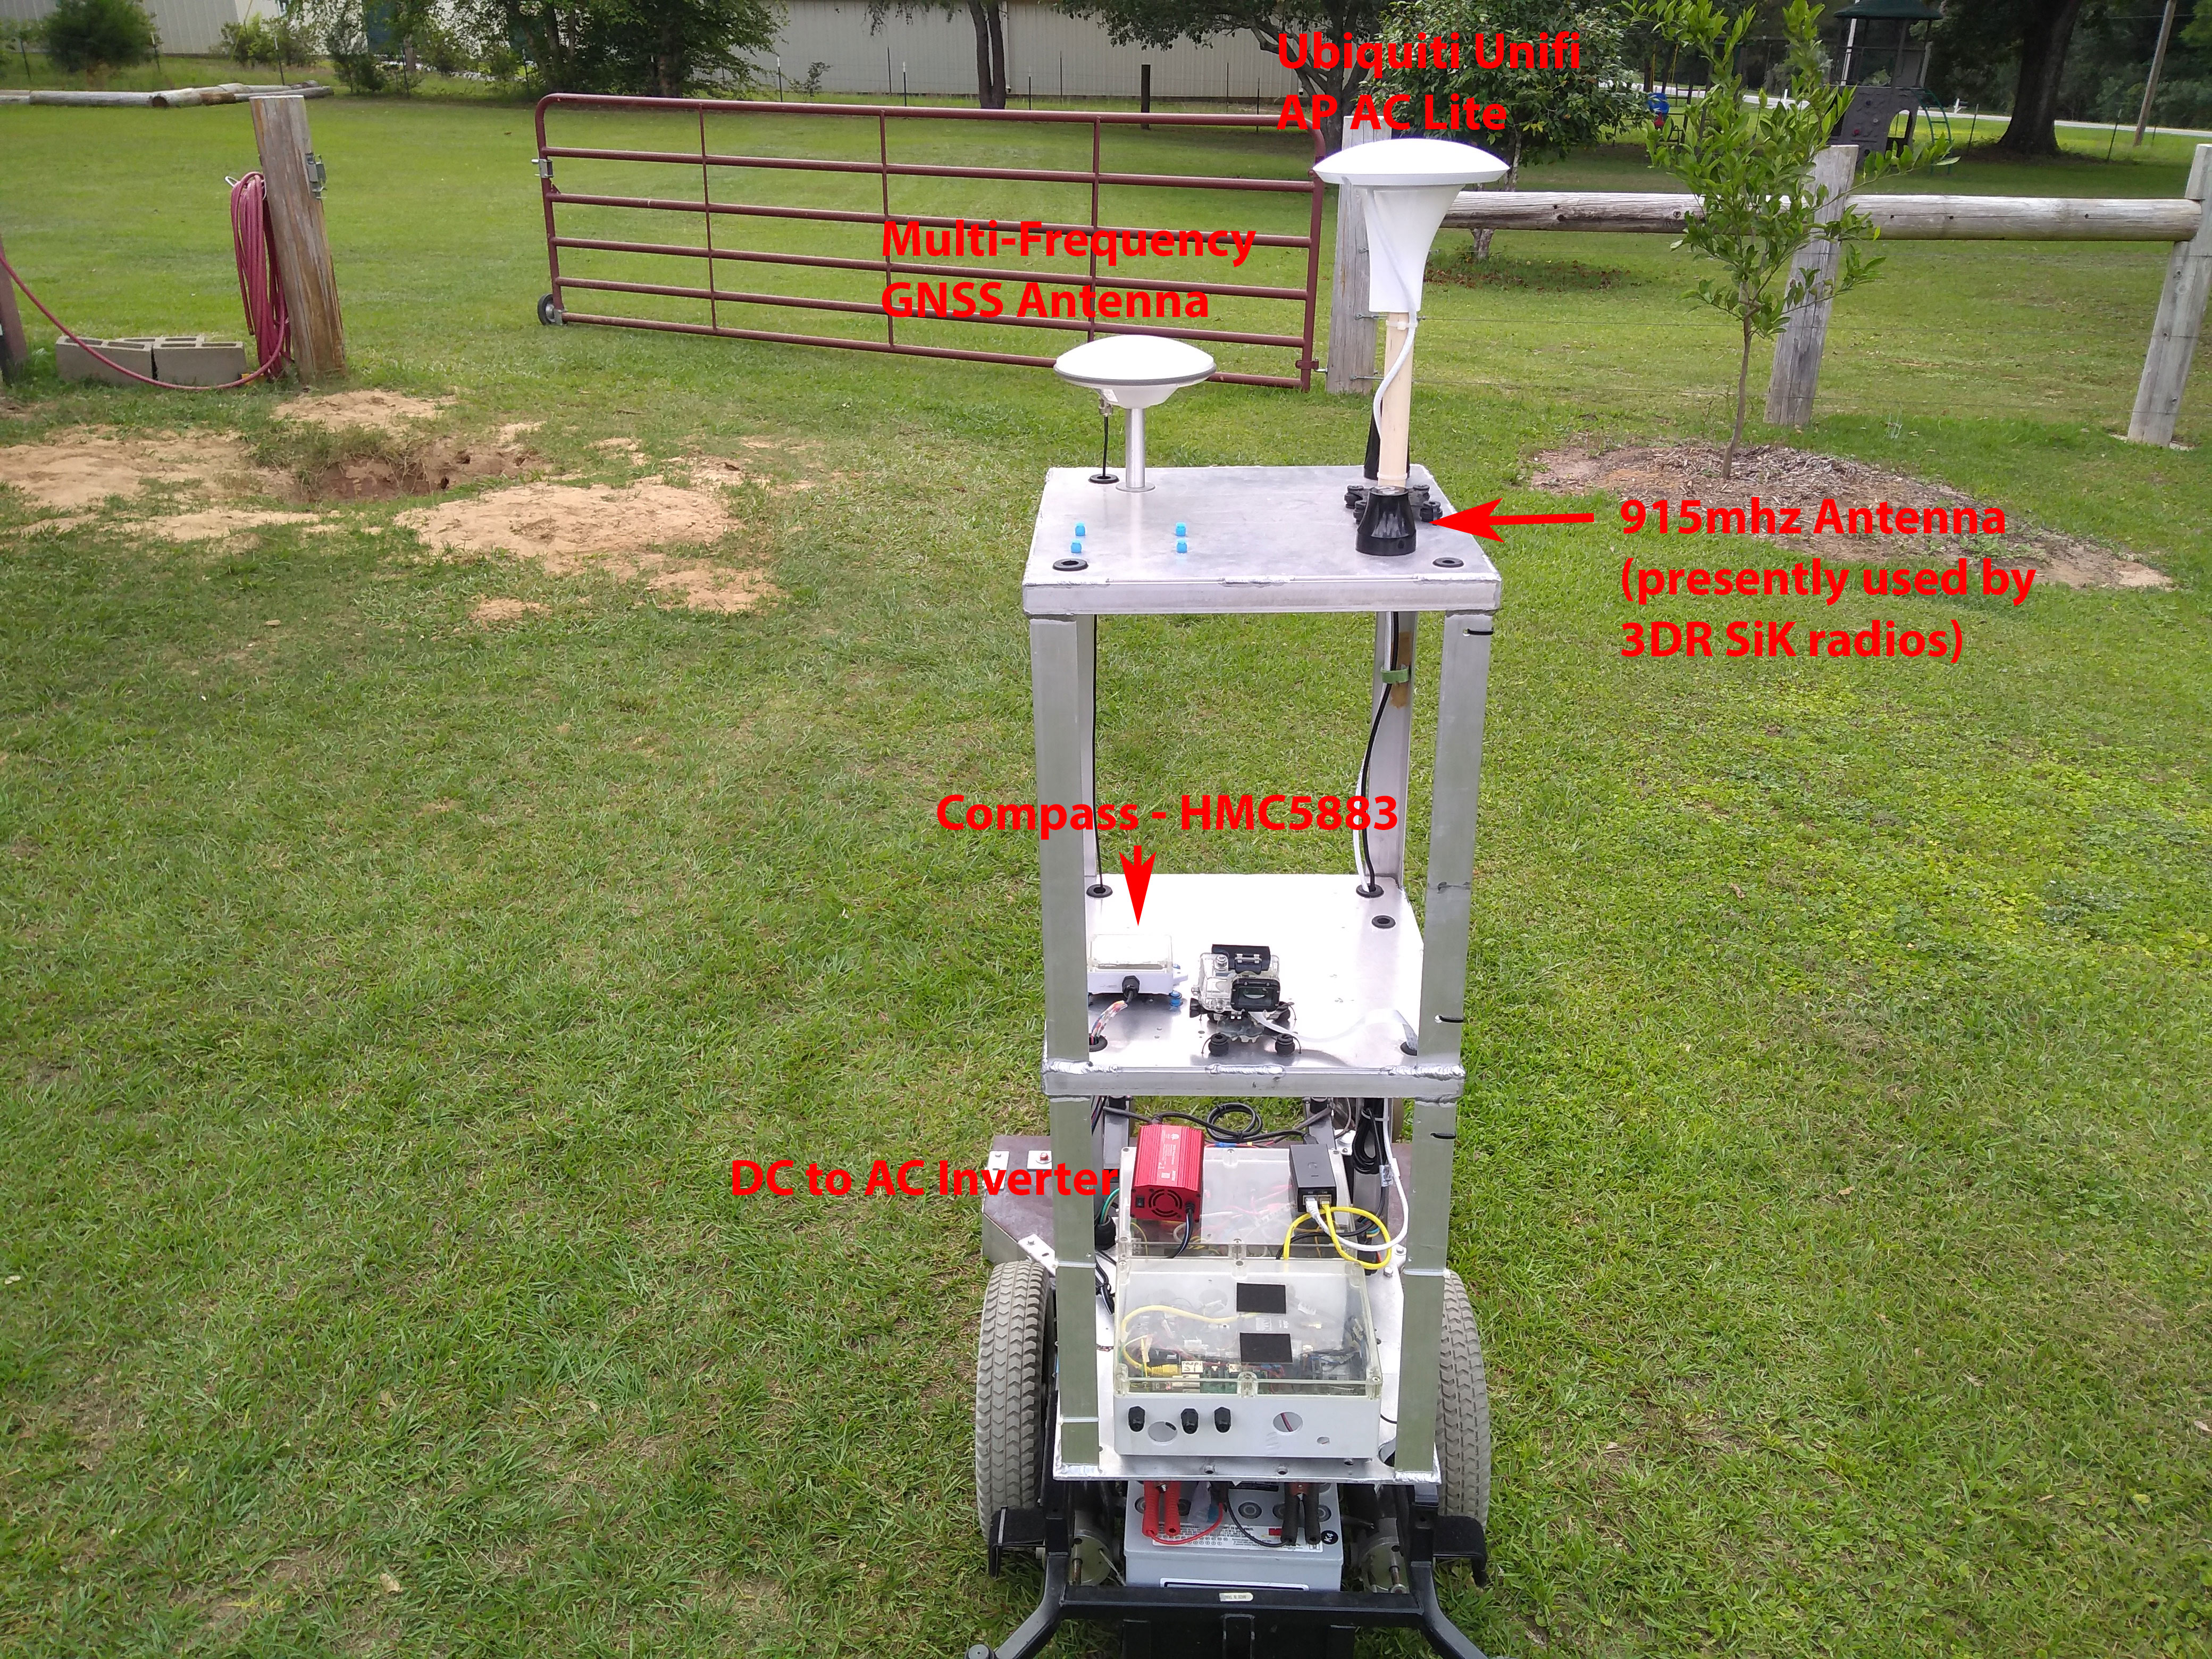
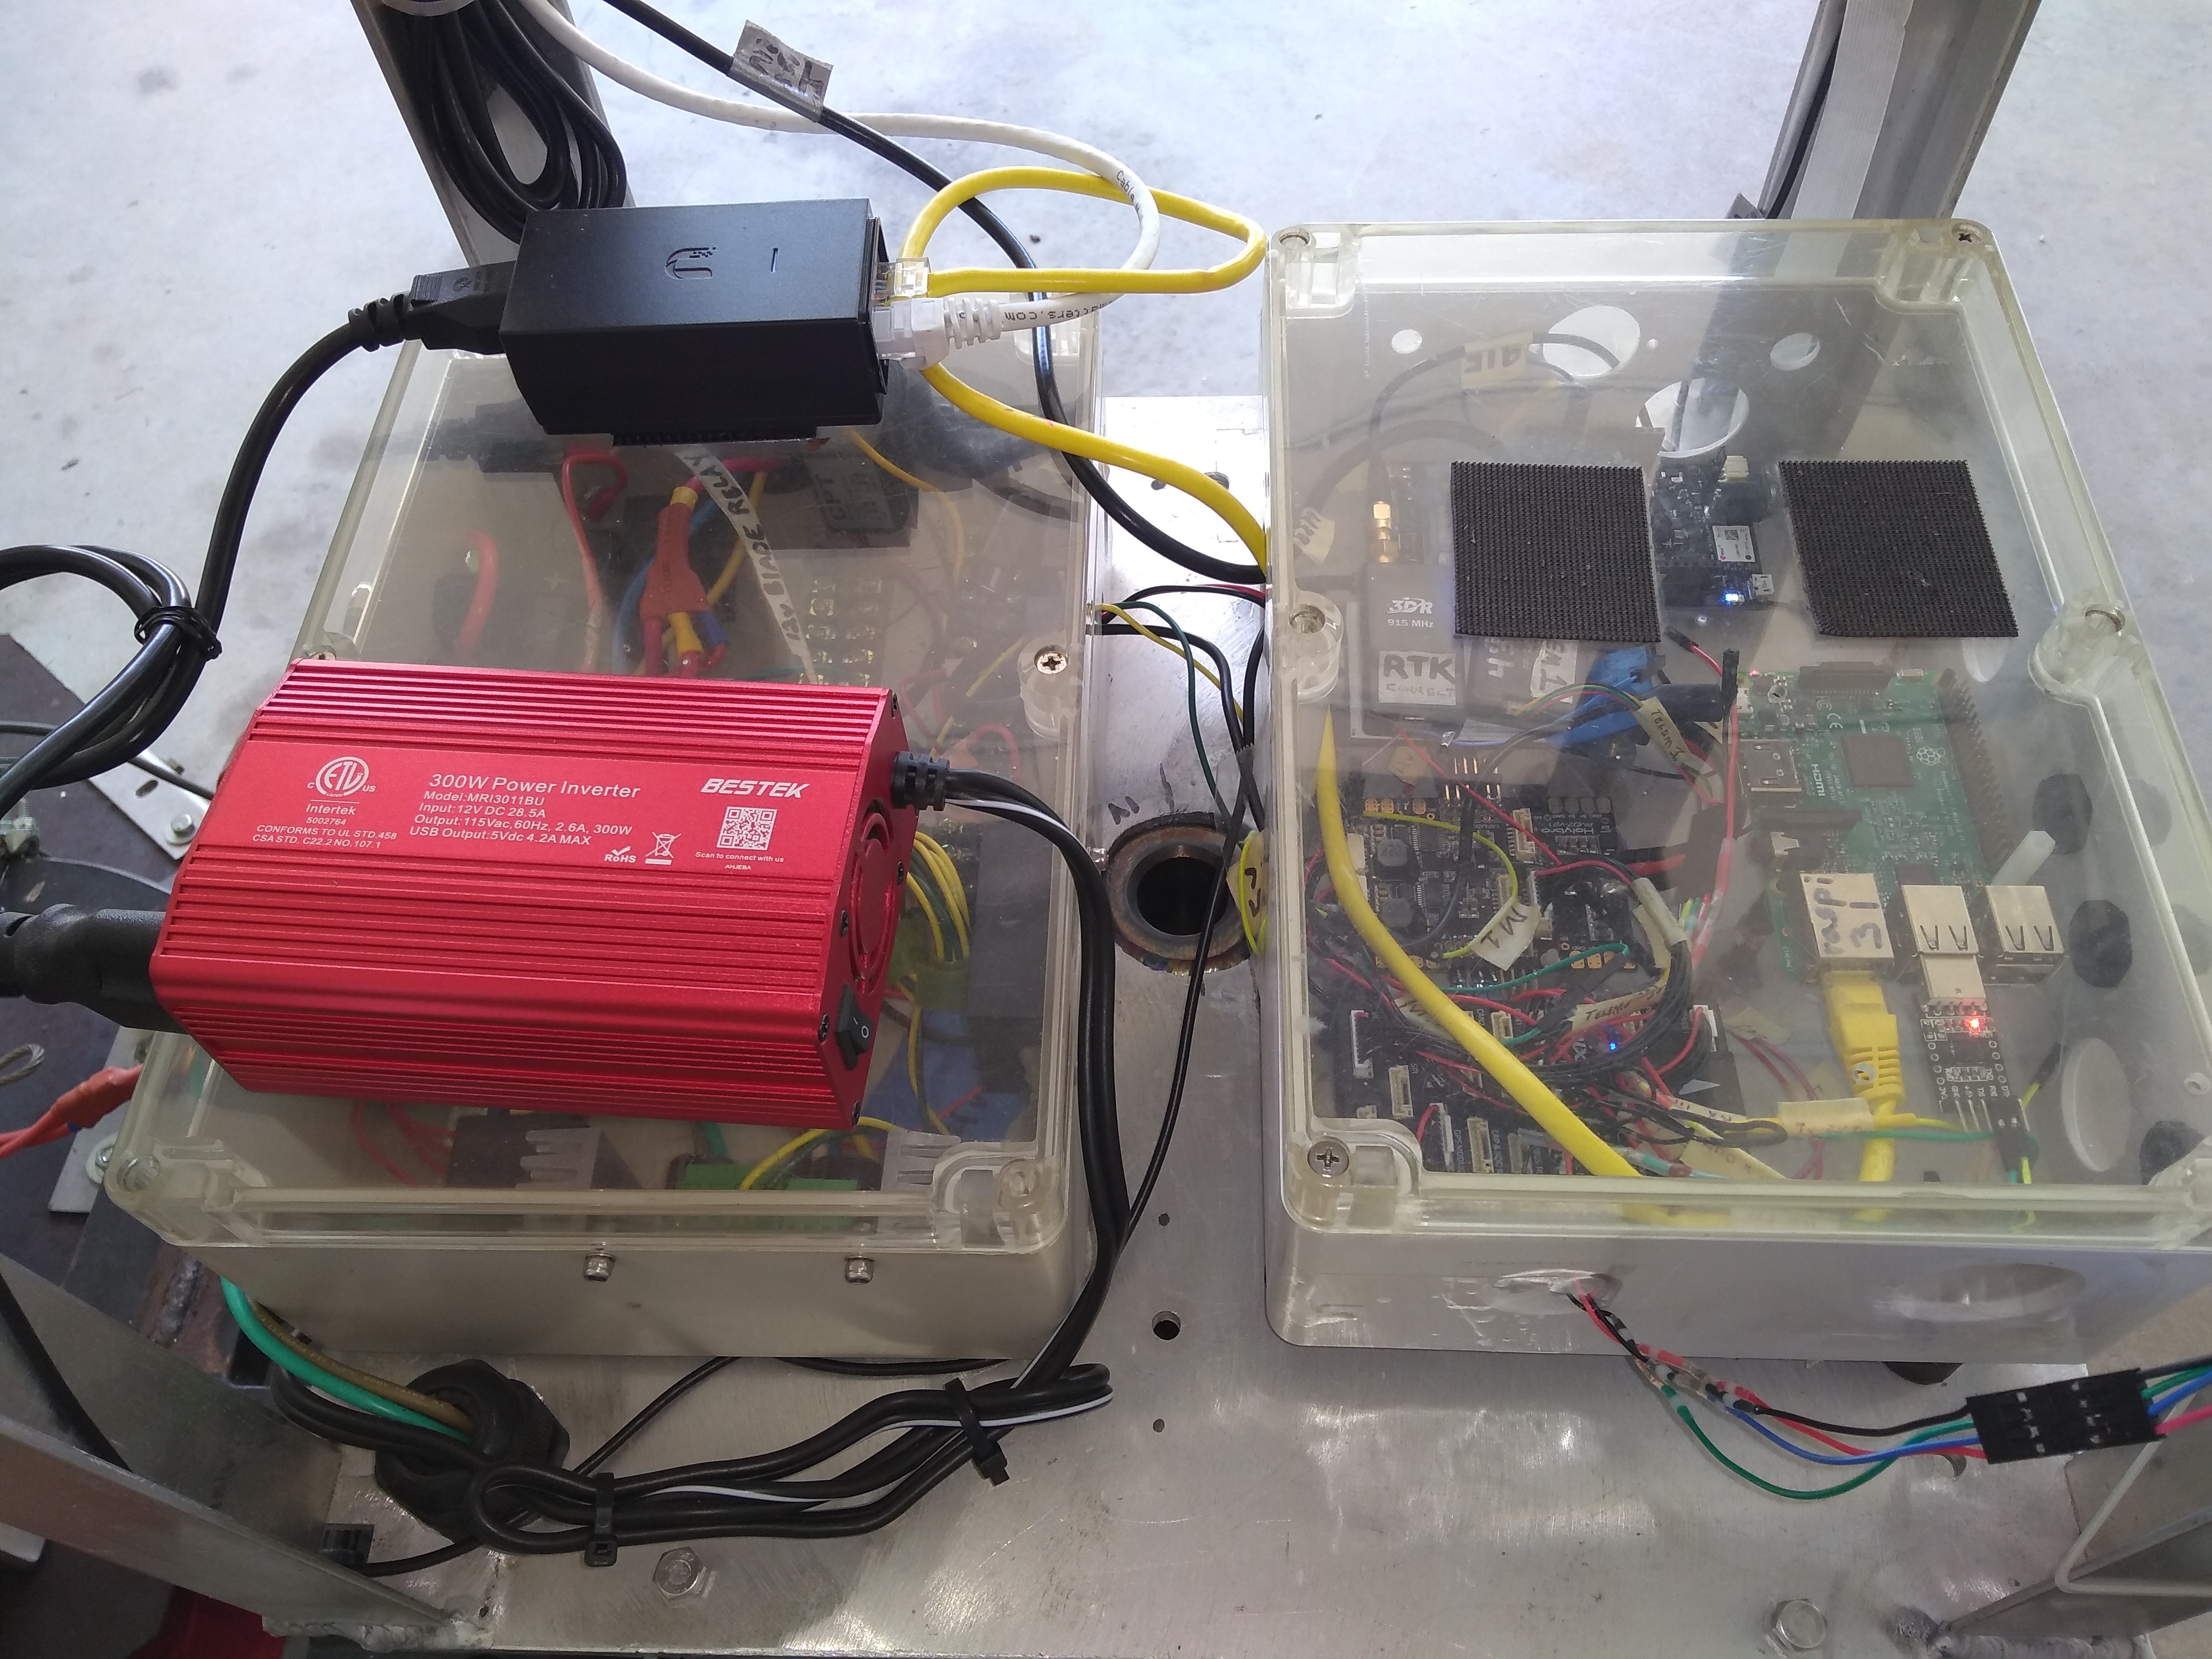
- Upgrade rover wifi system with Ubiquiti mesh network5 (i.e. we run a Ubiquiti access point on the the rover that’s joined to our local Ubiquiti network. This offers many benefits, for example: it’s now trivial to shell/VNC into rover’s onboard Raspberry Pi from any computer on our local network).
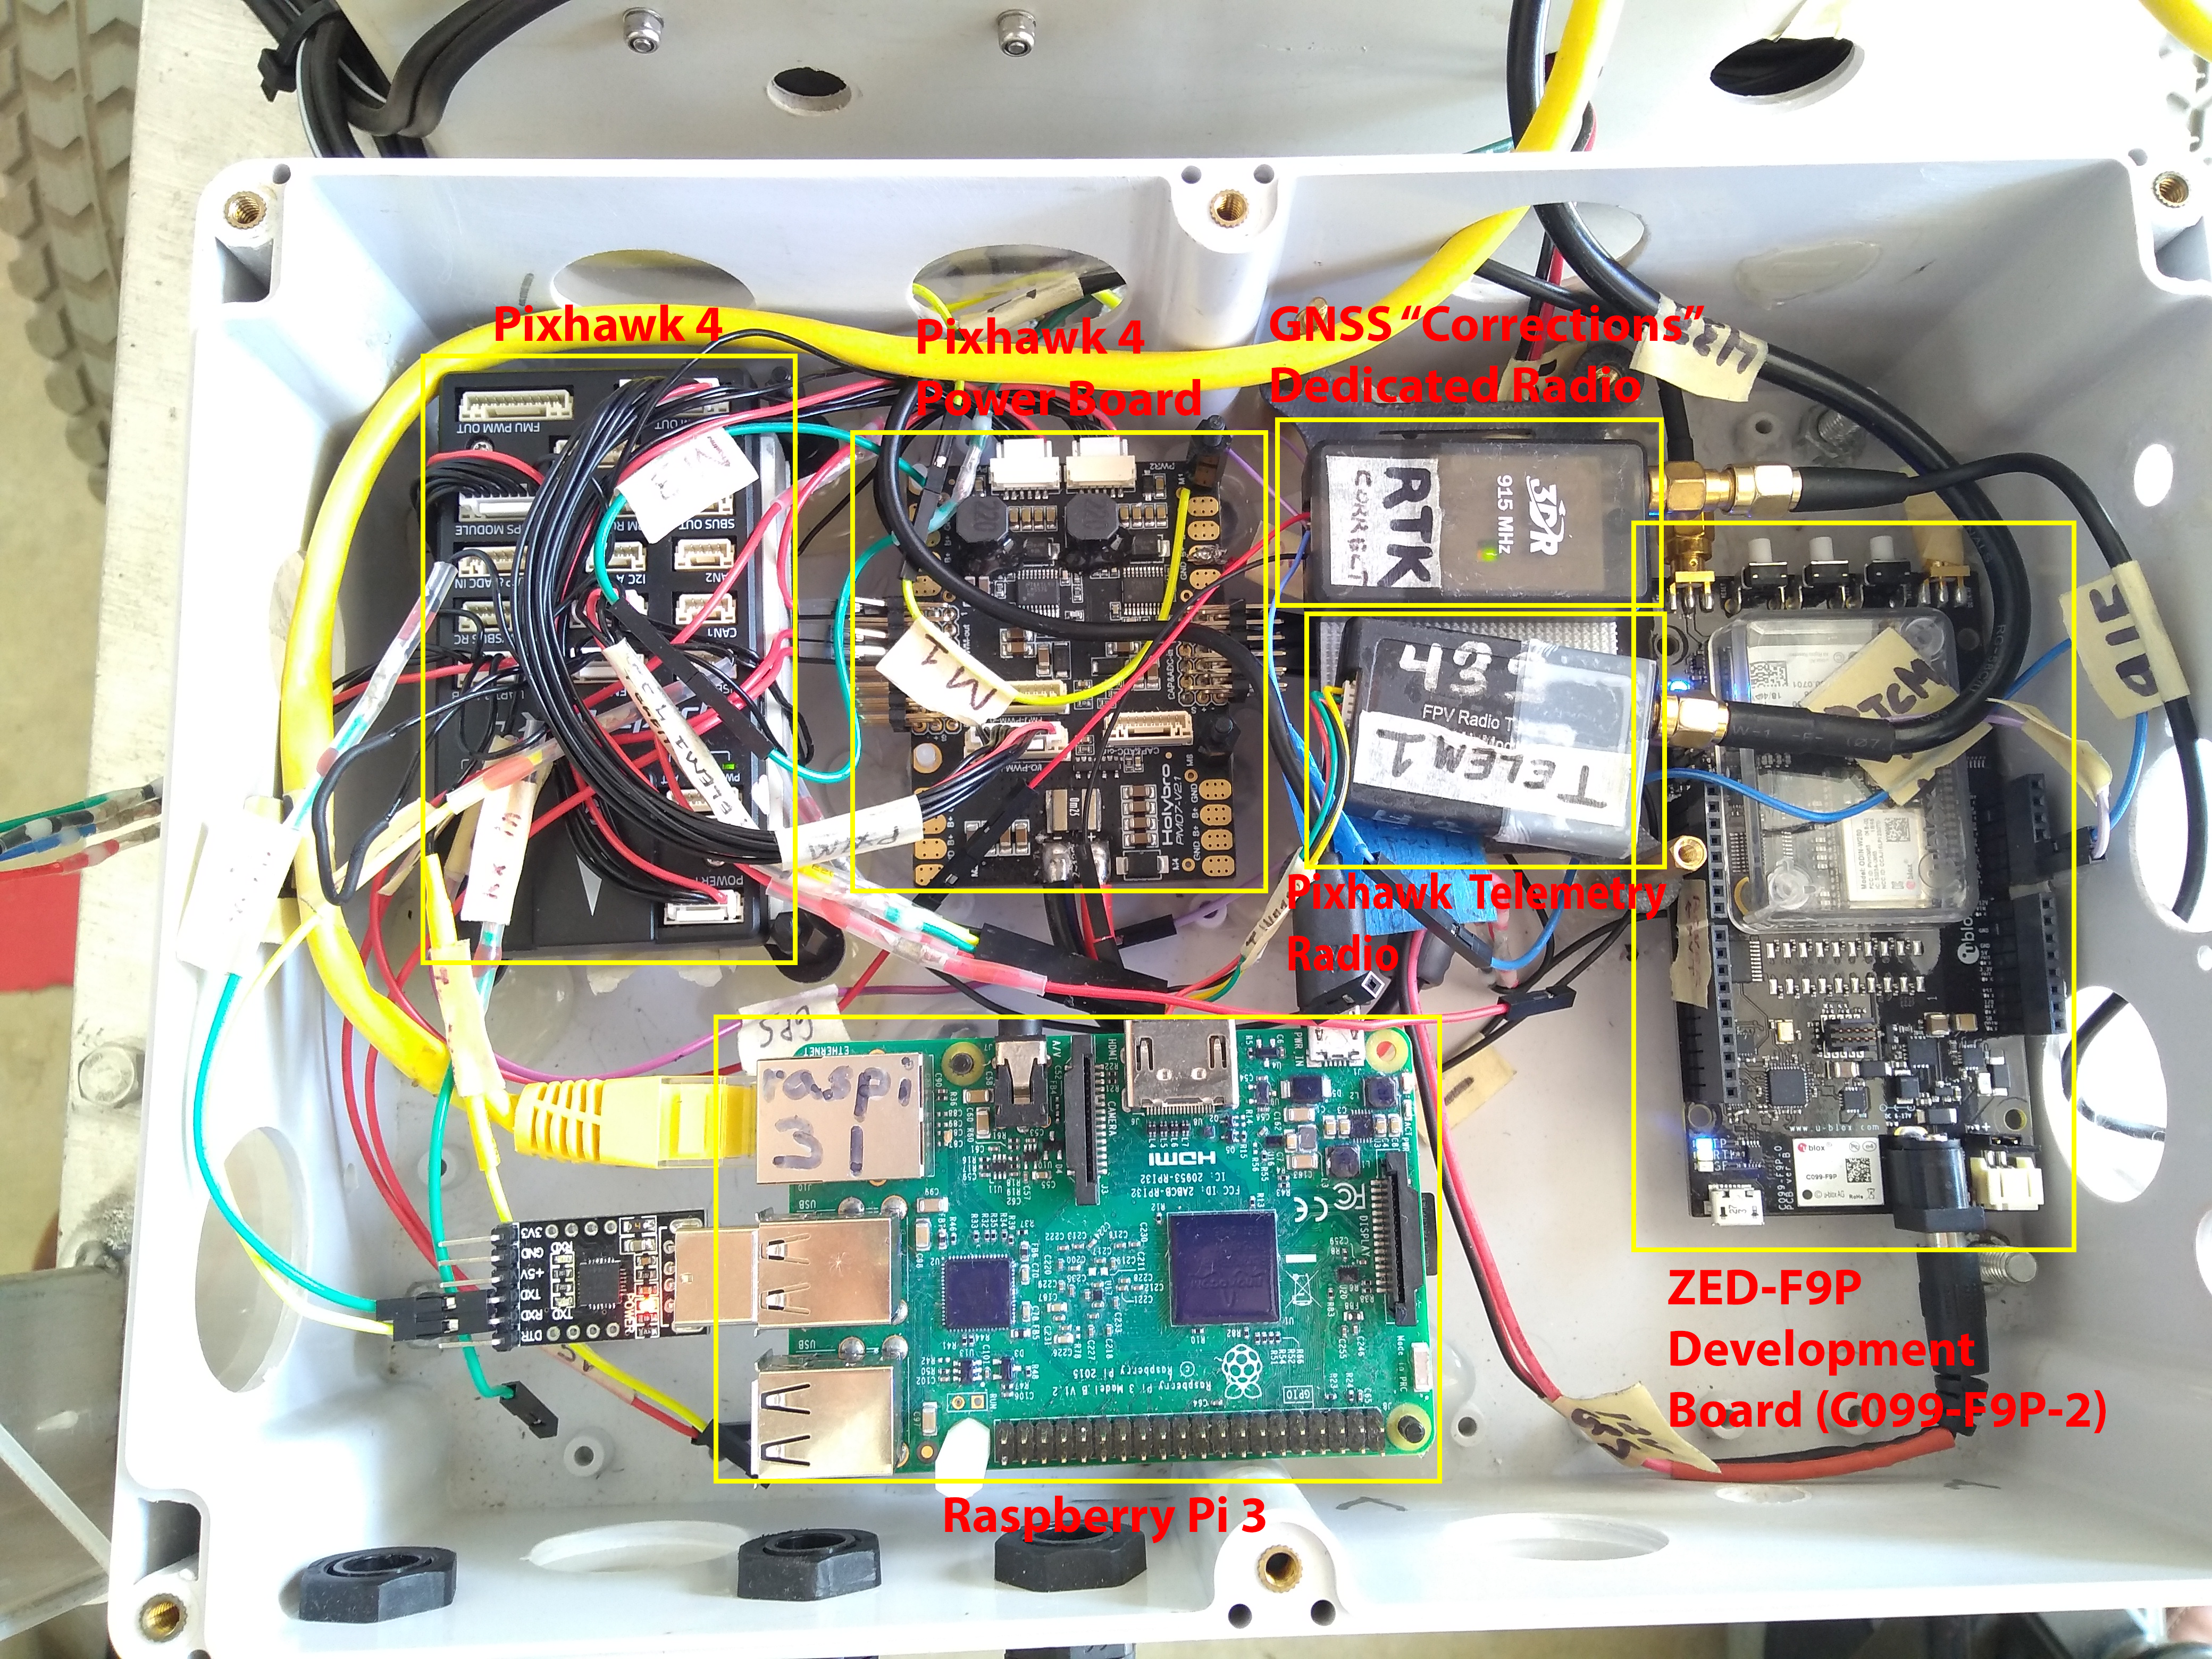
- Replace Pixhawk 1 autopilot with Pixhawk 4 autopilot. Just to be clear, this is not because the Pixhawk 1’s functionality is yet significantly outdated for this application (even though Pixhawk has been around since 2013) — instead, when Holybro introduced the Pixhawk 4 I got curious about it’s performance, and liking it’s specs (and Holybro’s solid reputation) but not finding many user reviews of the module, curiosity overtook and I just bought the little guy from Sparkfun.

Mowing Deck Build
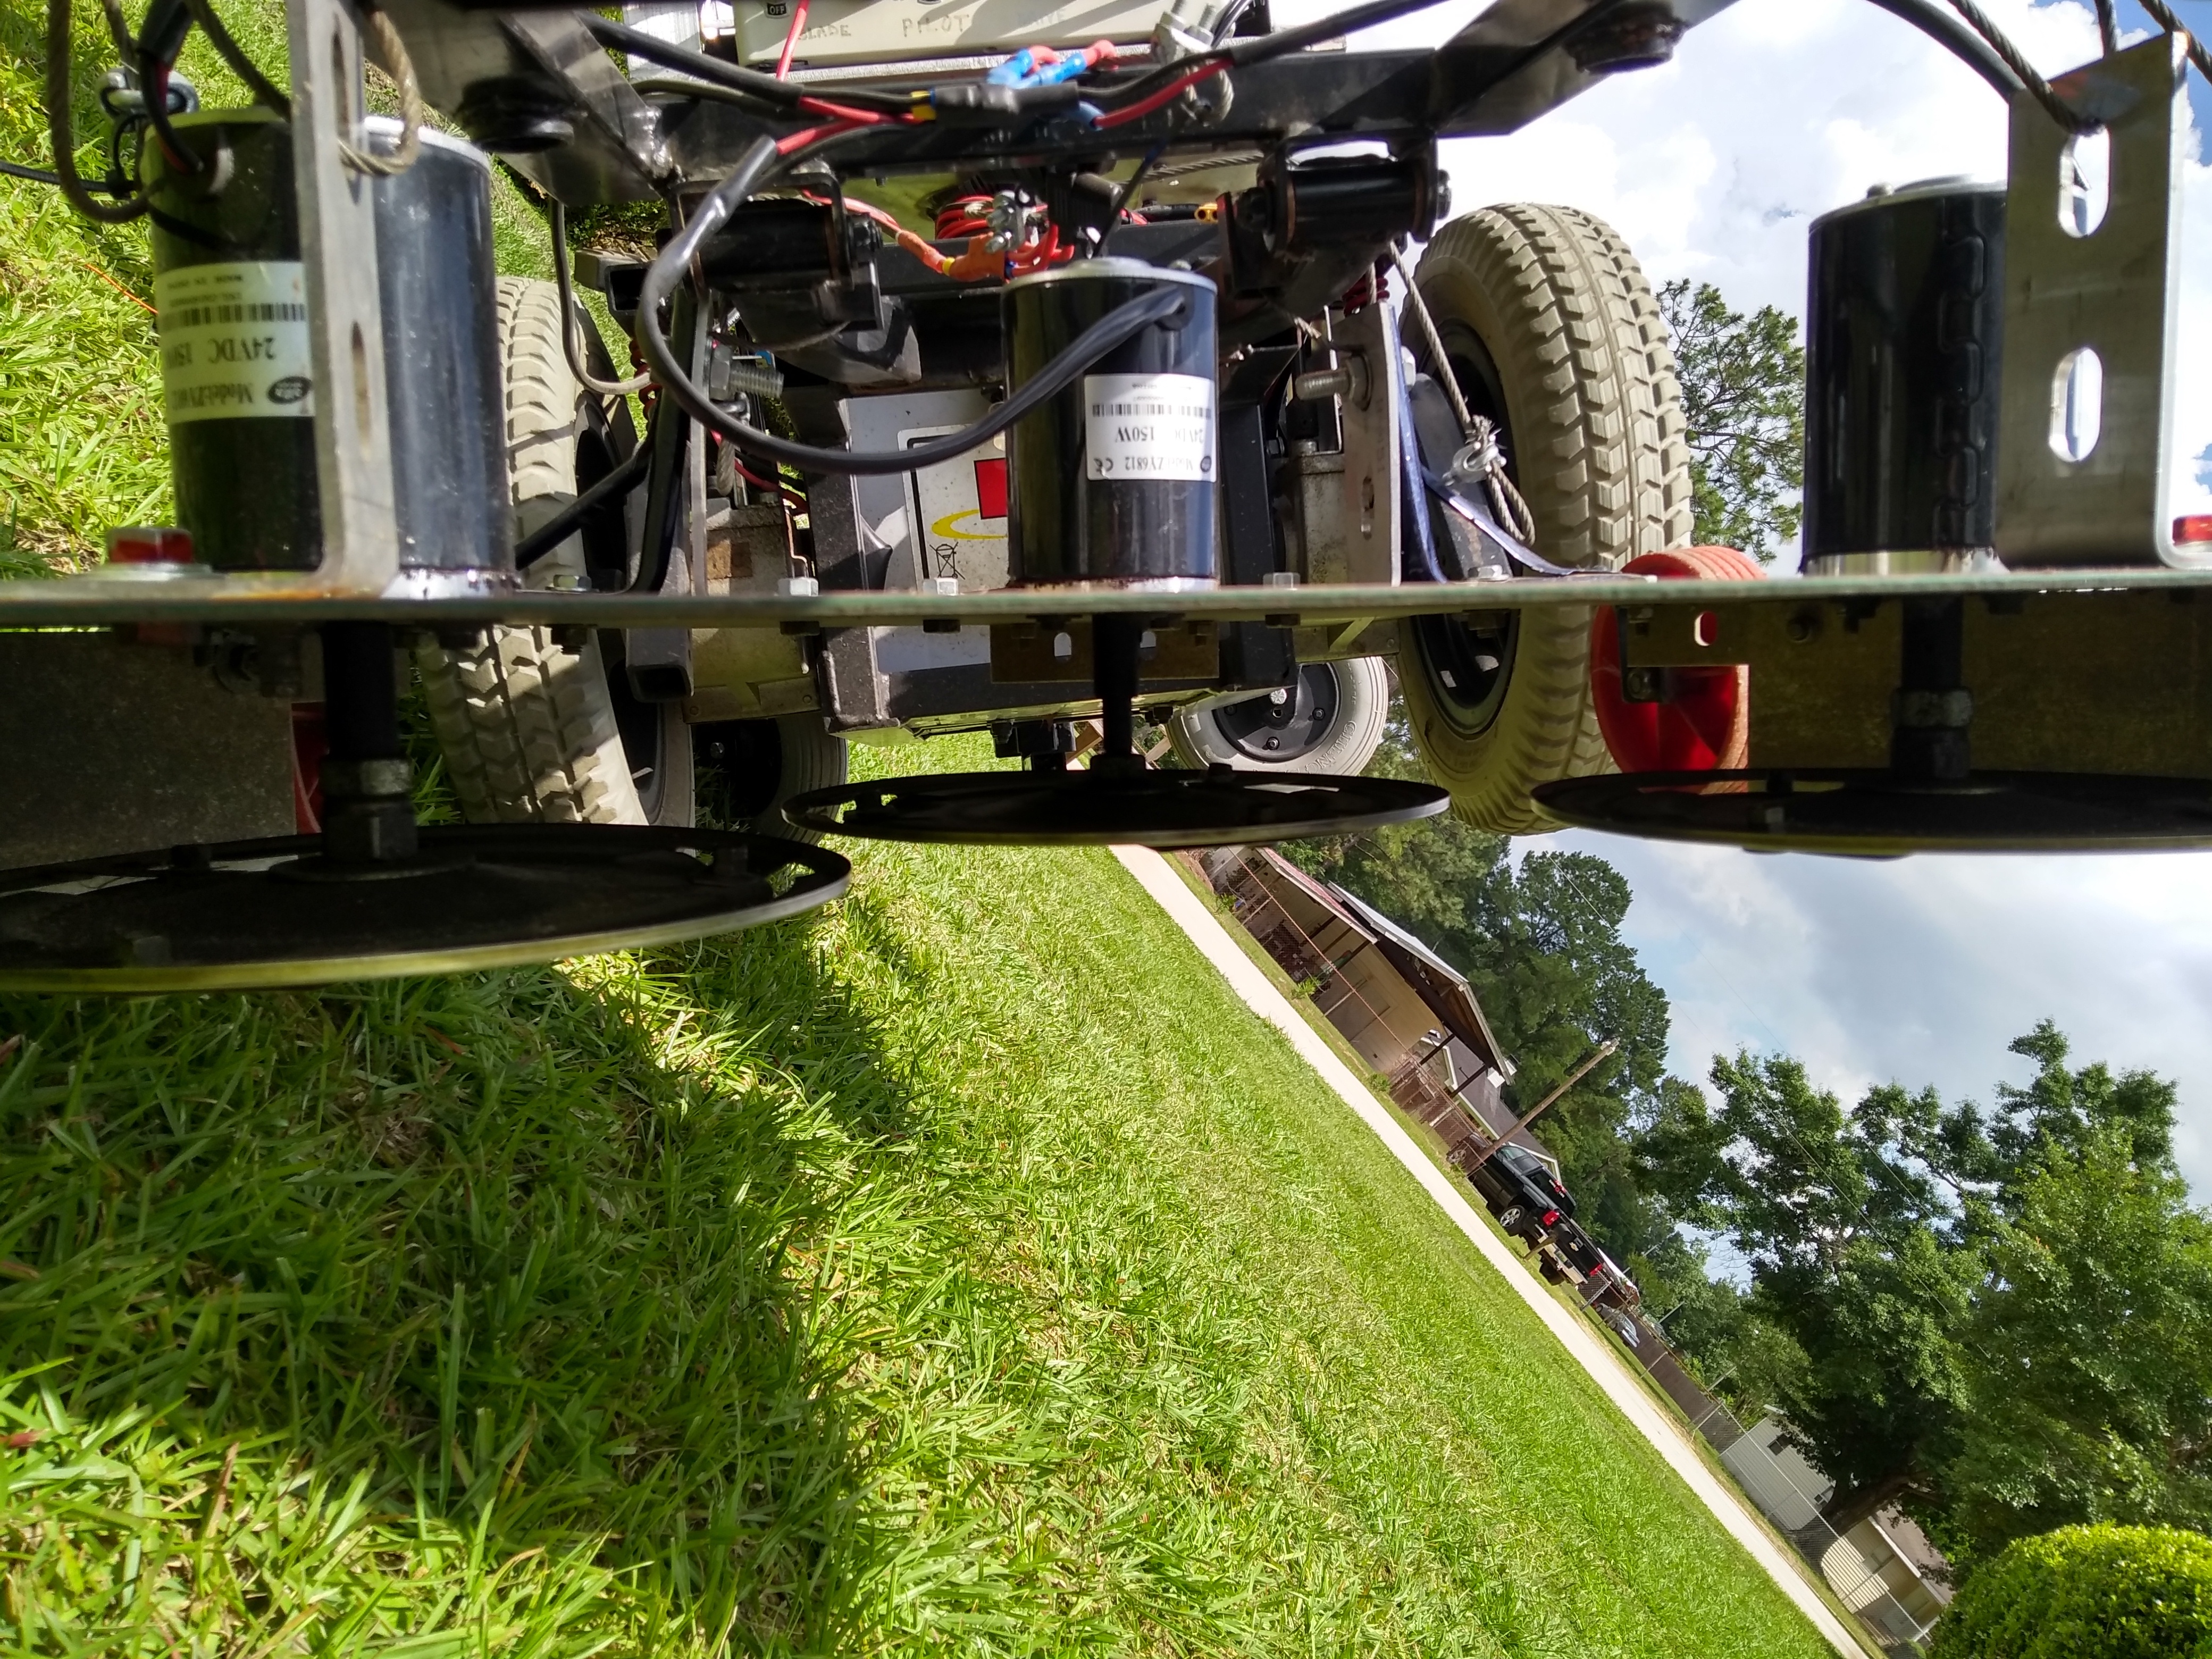
We hacked together a mowing rig6 as follows:
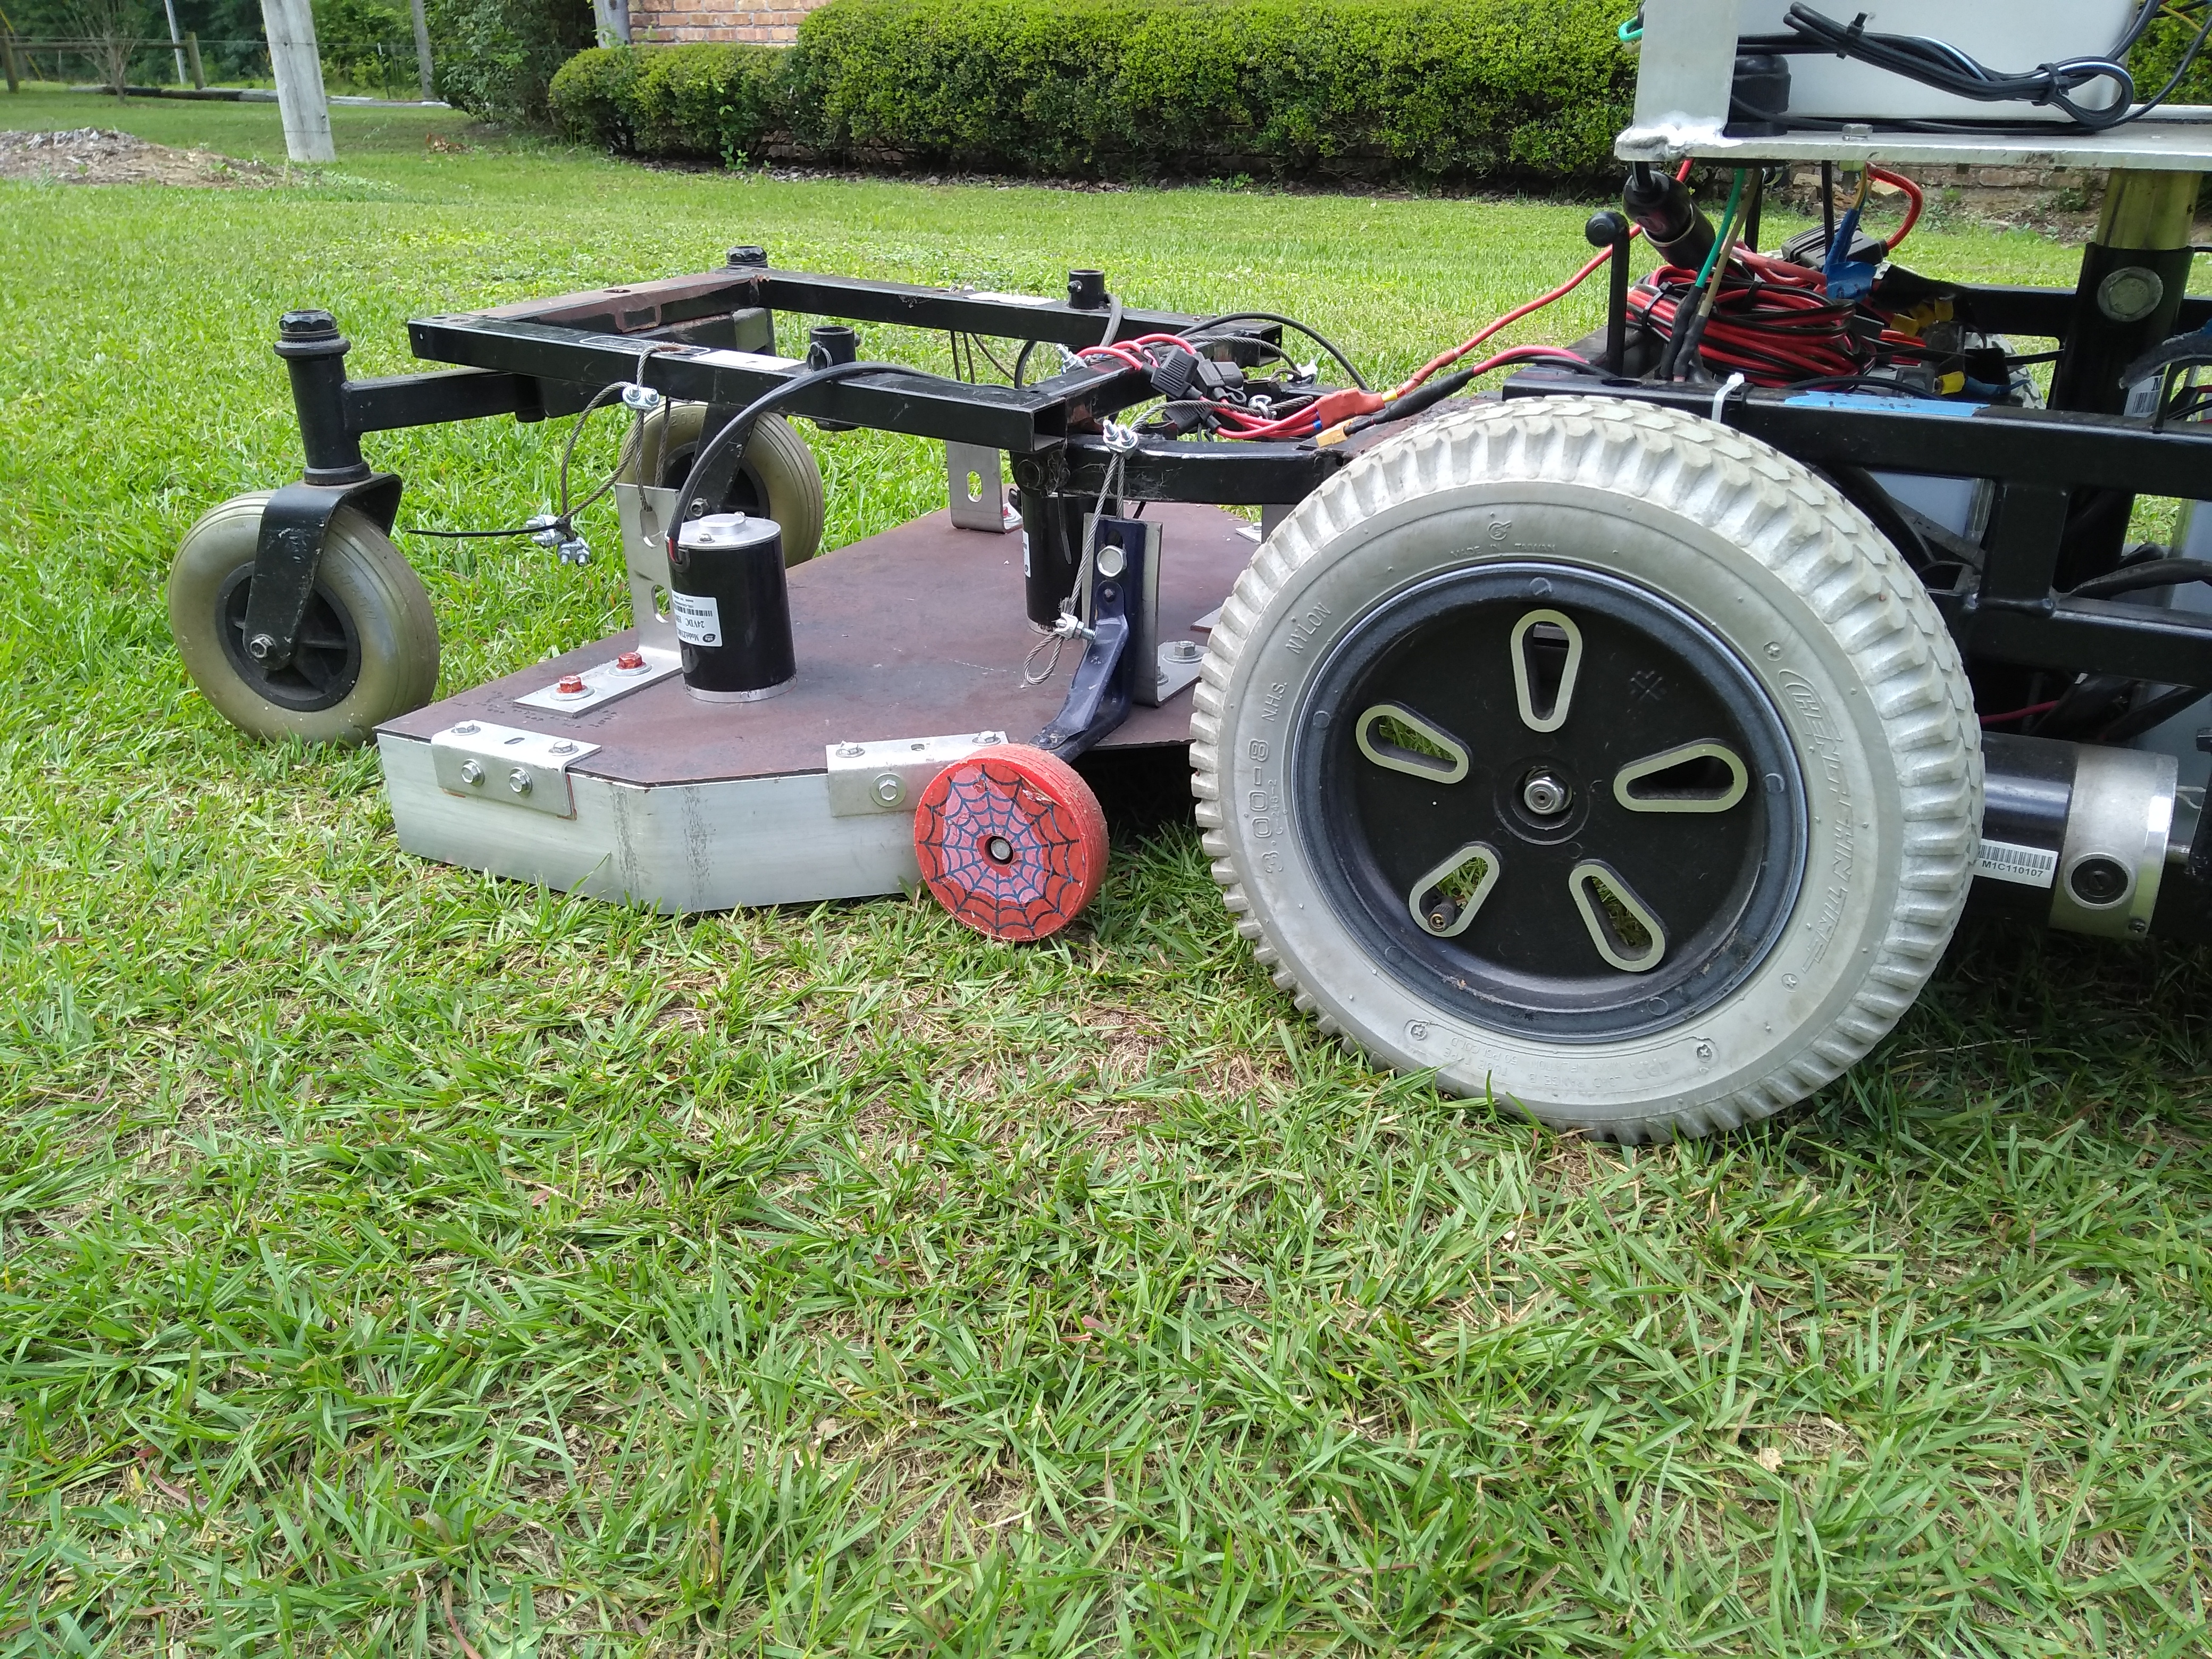
- After eyeing the big 60″ deck on our old Scag mower, we cut out a similarly-shaped (albeit scaled-down) hexagon from 1/8″ sheet metal.
- Procure 3 24v 150W ZY6812 150-GM150115 DC motors from eBay (somehow those powerful motors are shipped to your door @ $25 a pop).
- Hook up some shaft coupler extensions (from eBay) to the DC motors. This buys us a couple extra inches of clearance between the mower deck and the blade disk. Note that I had to Loctite the nuts that snug these extensions to the motors. Also note that if you want to purchase extra nuts for this extension (for example, if you want to hold those Honda disks in place by sandwiching the blade disk between two nuts), that the nut size ia a little odd: M10 Left Hand 1.5. This Amazon query should get you what you need.
- Bolt the 3 DC motors to mowing deck sheet metal.
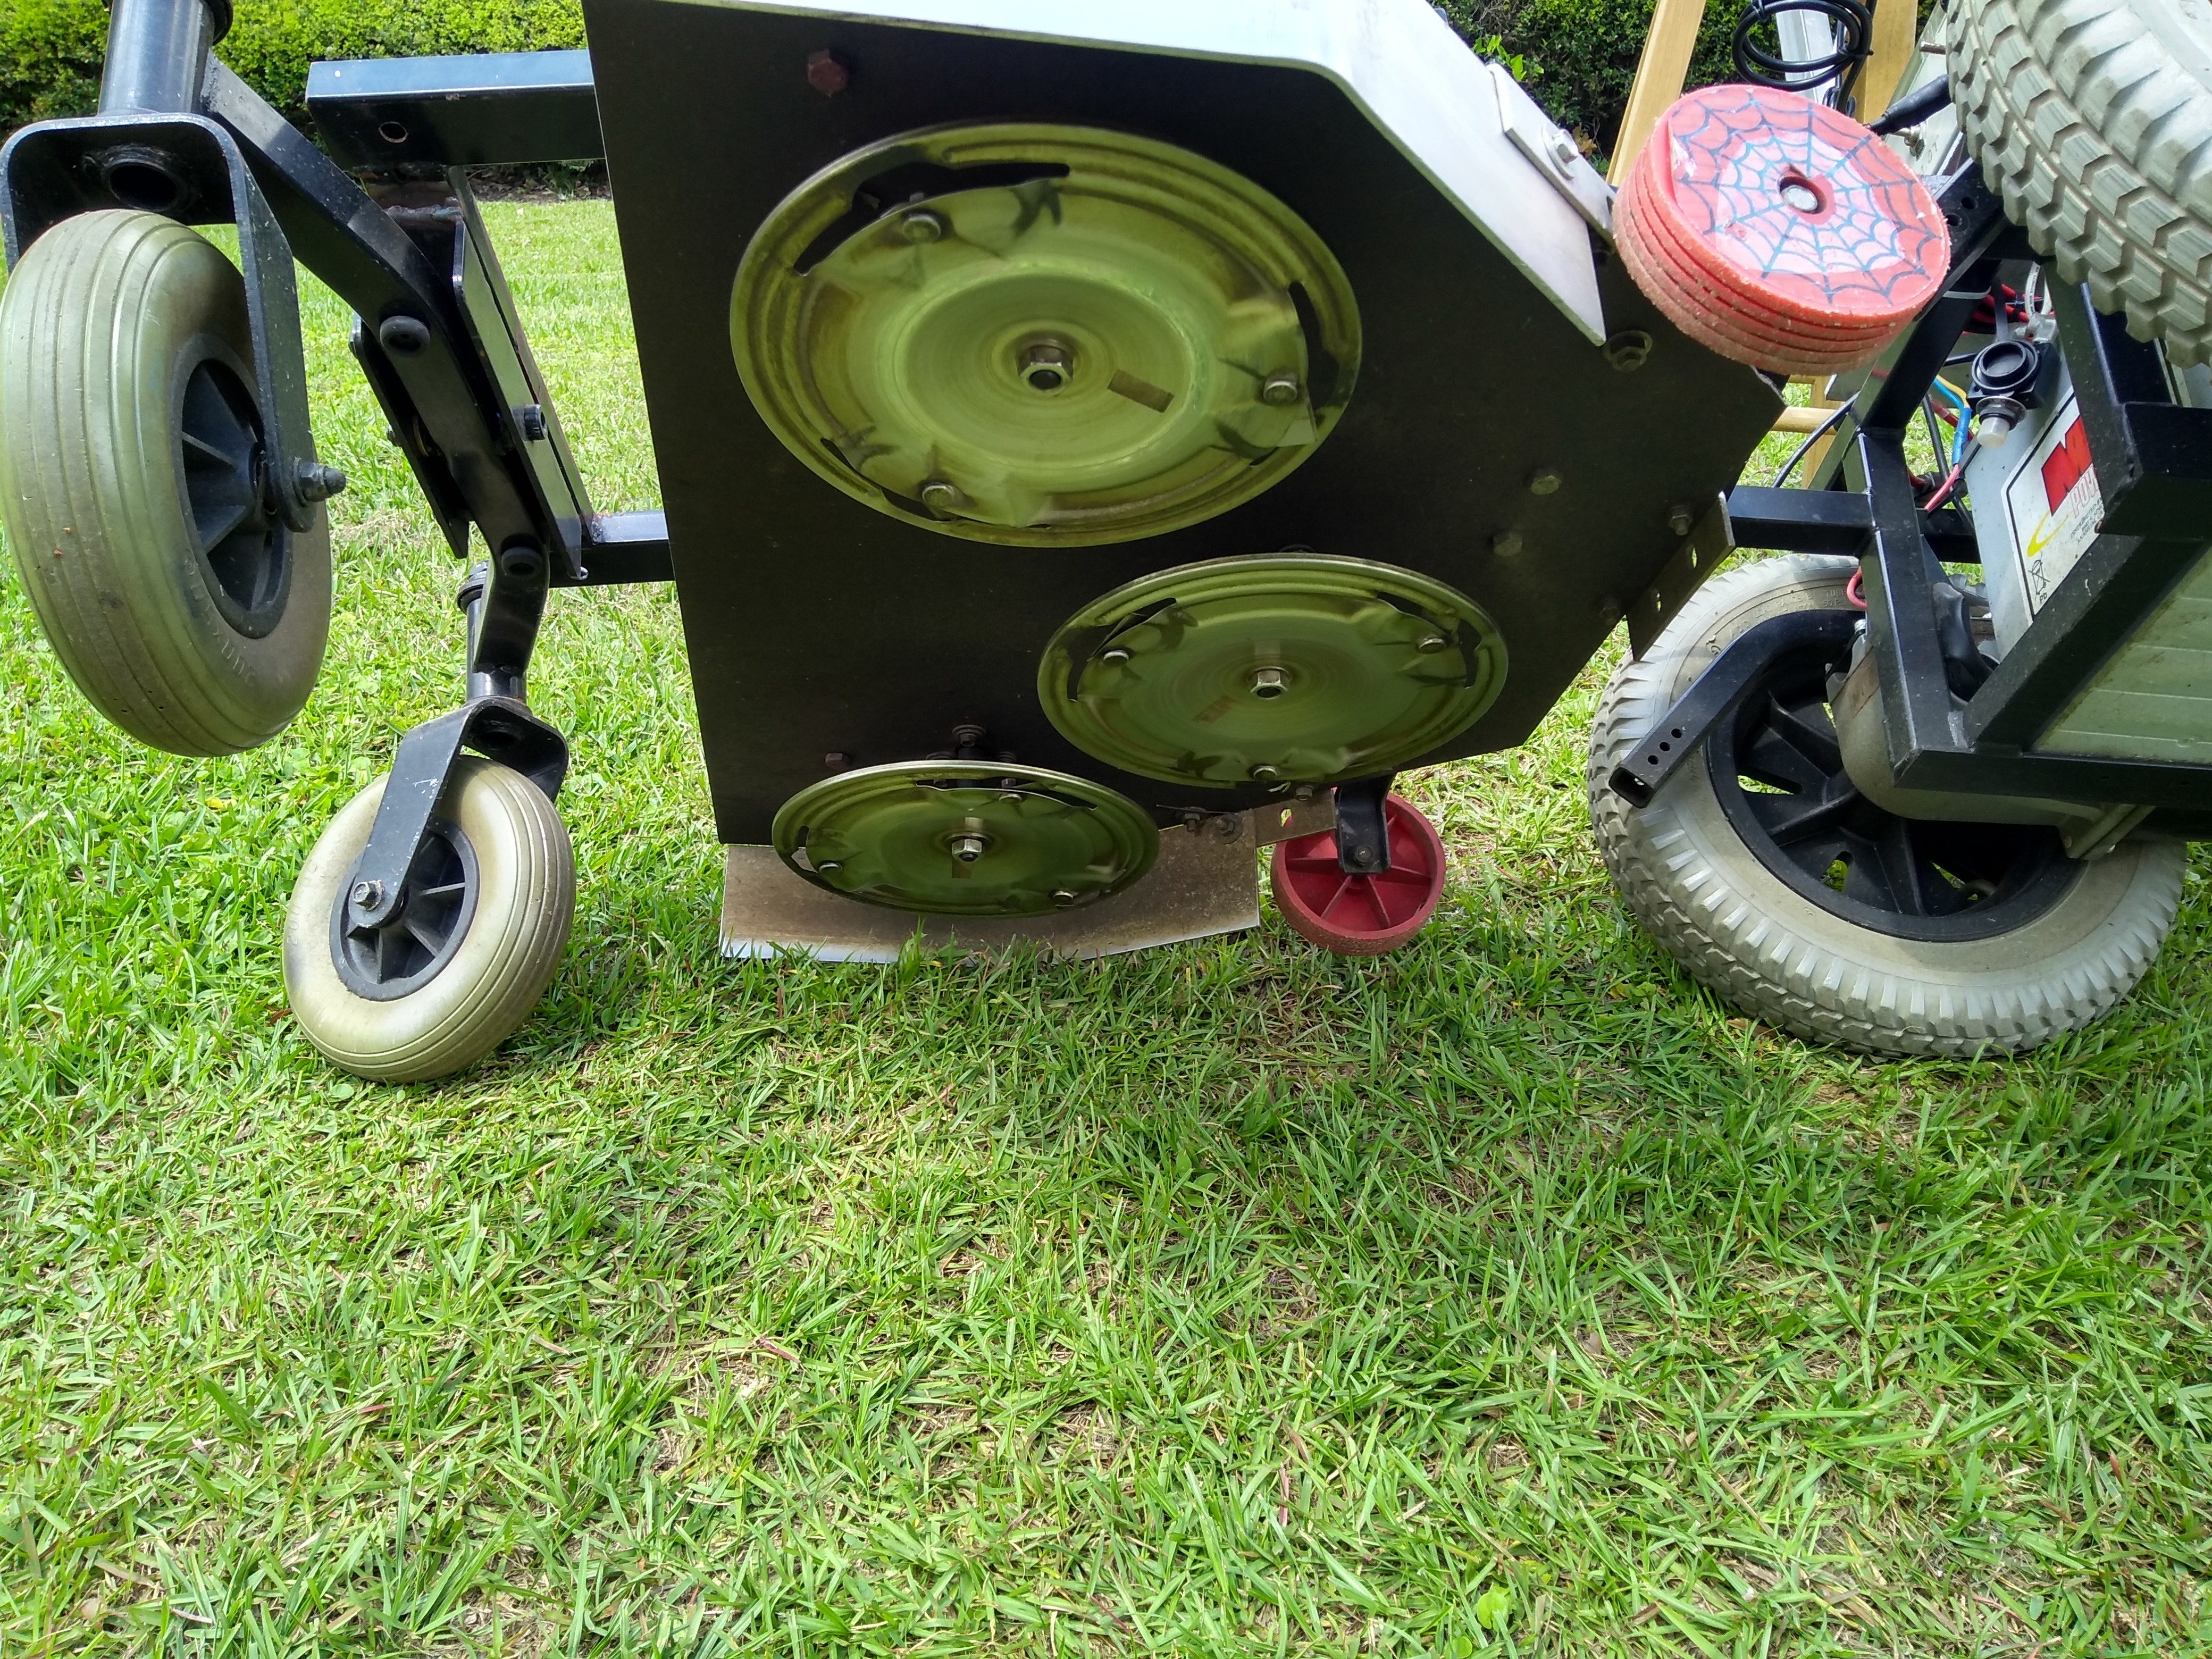
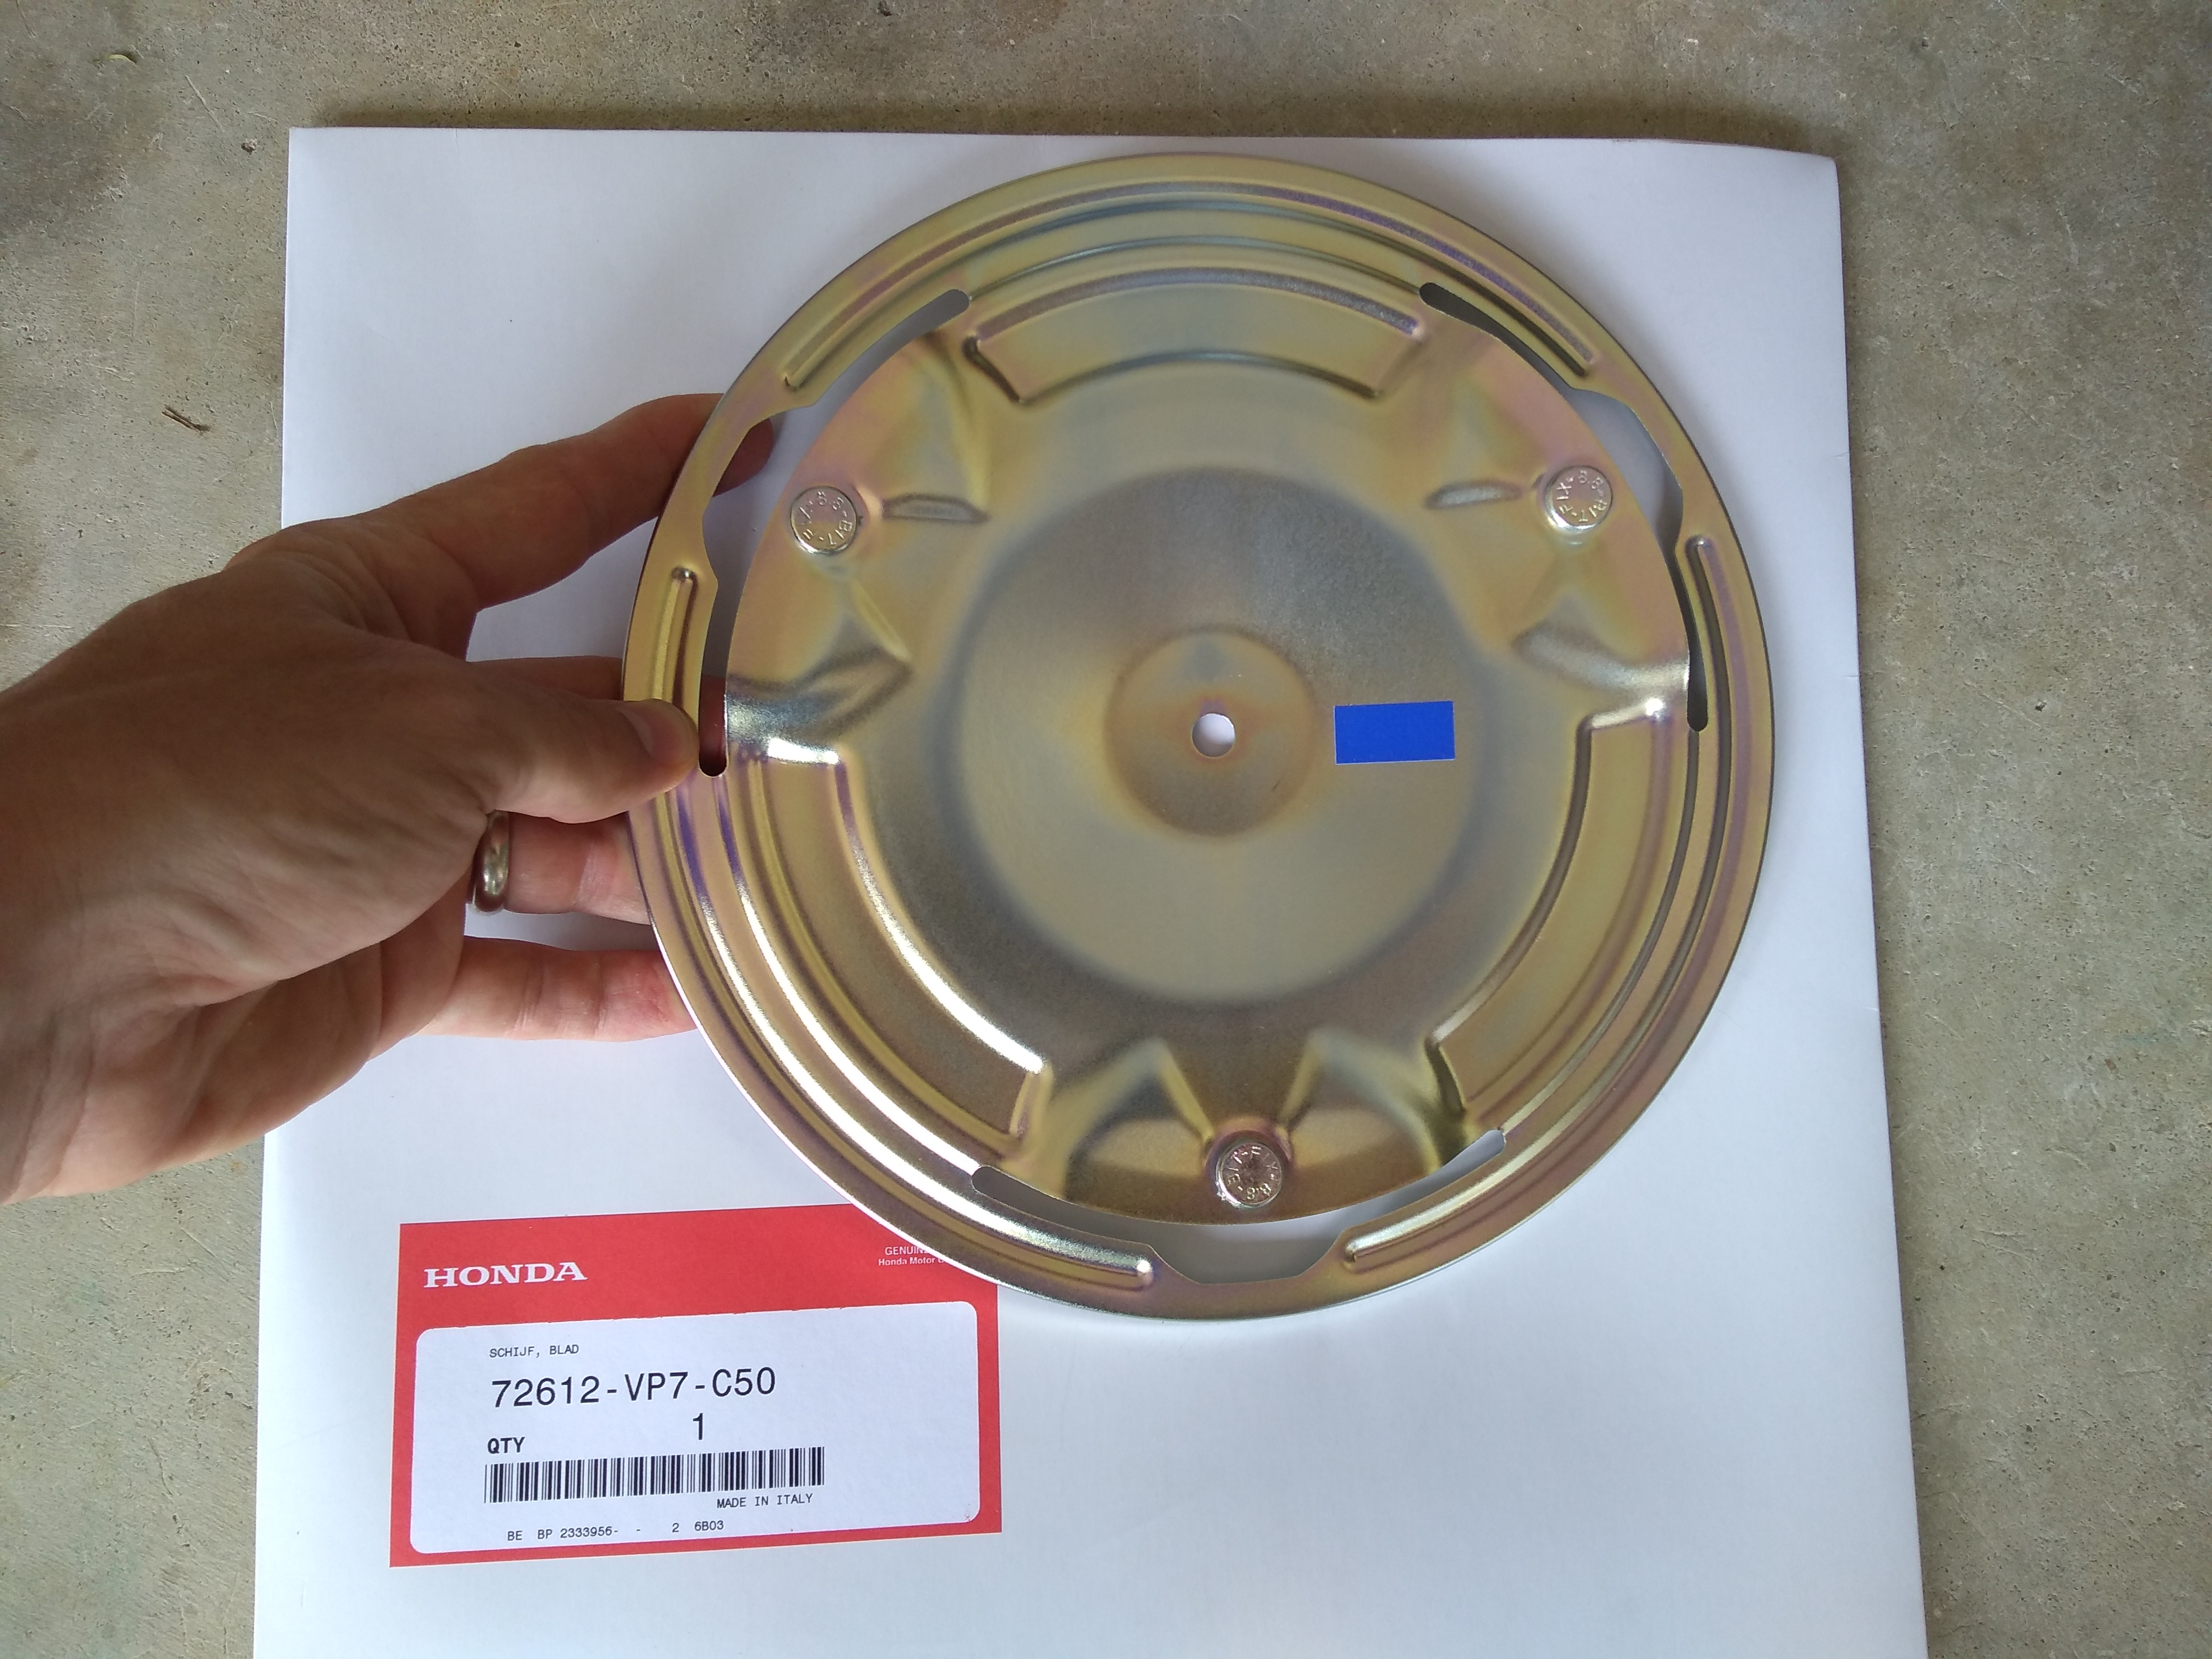
- Attach Honda blade disks to the shaft coupler extensions. I like the Honda disks because they’re metal (and because they’re Honda). I had to drill out the hole in the center of the disk slightly — i.e. you have to make the hole’s diameter a little bigger to use the shaft coupler extensions that we’re using.
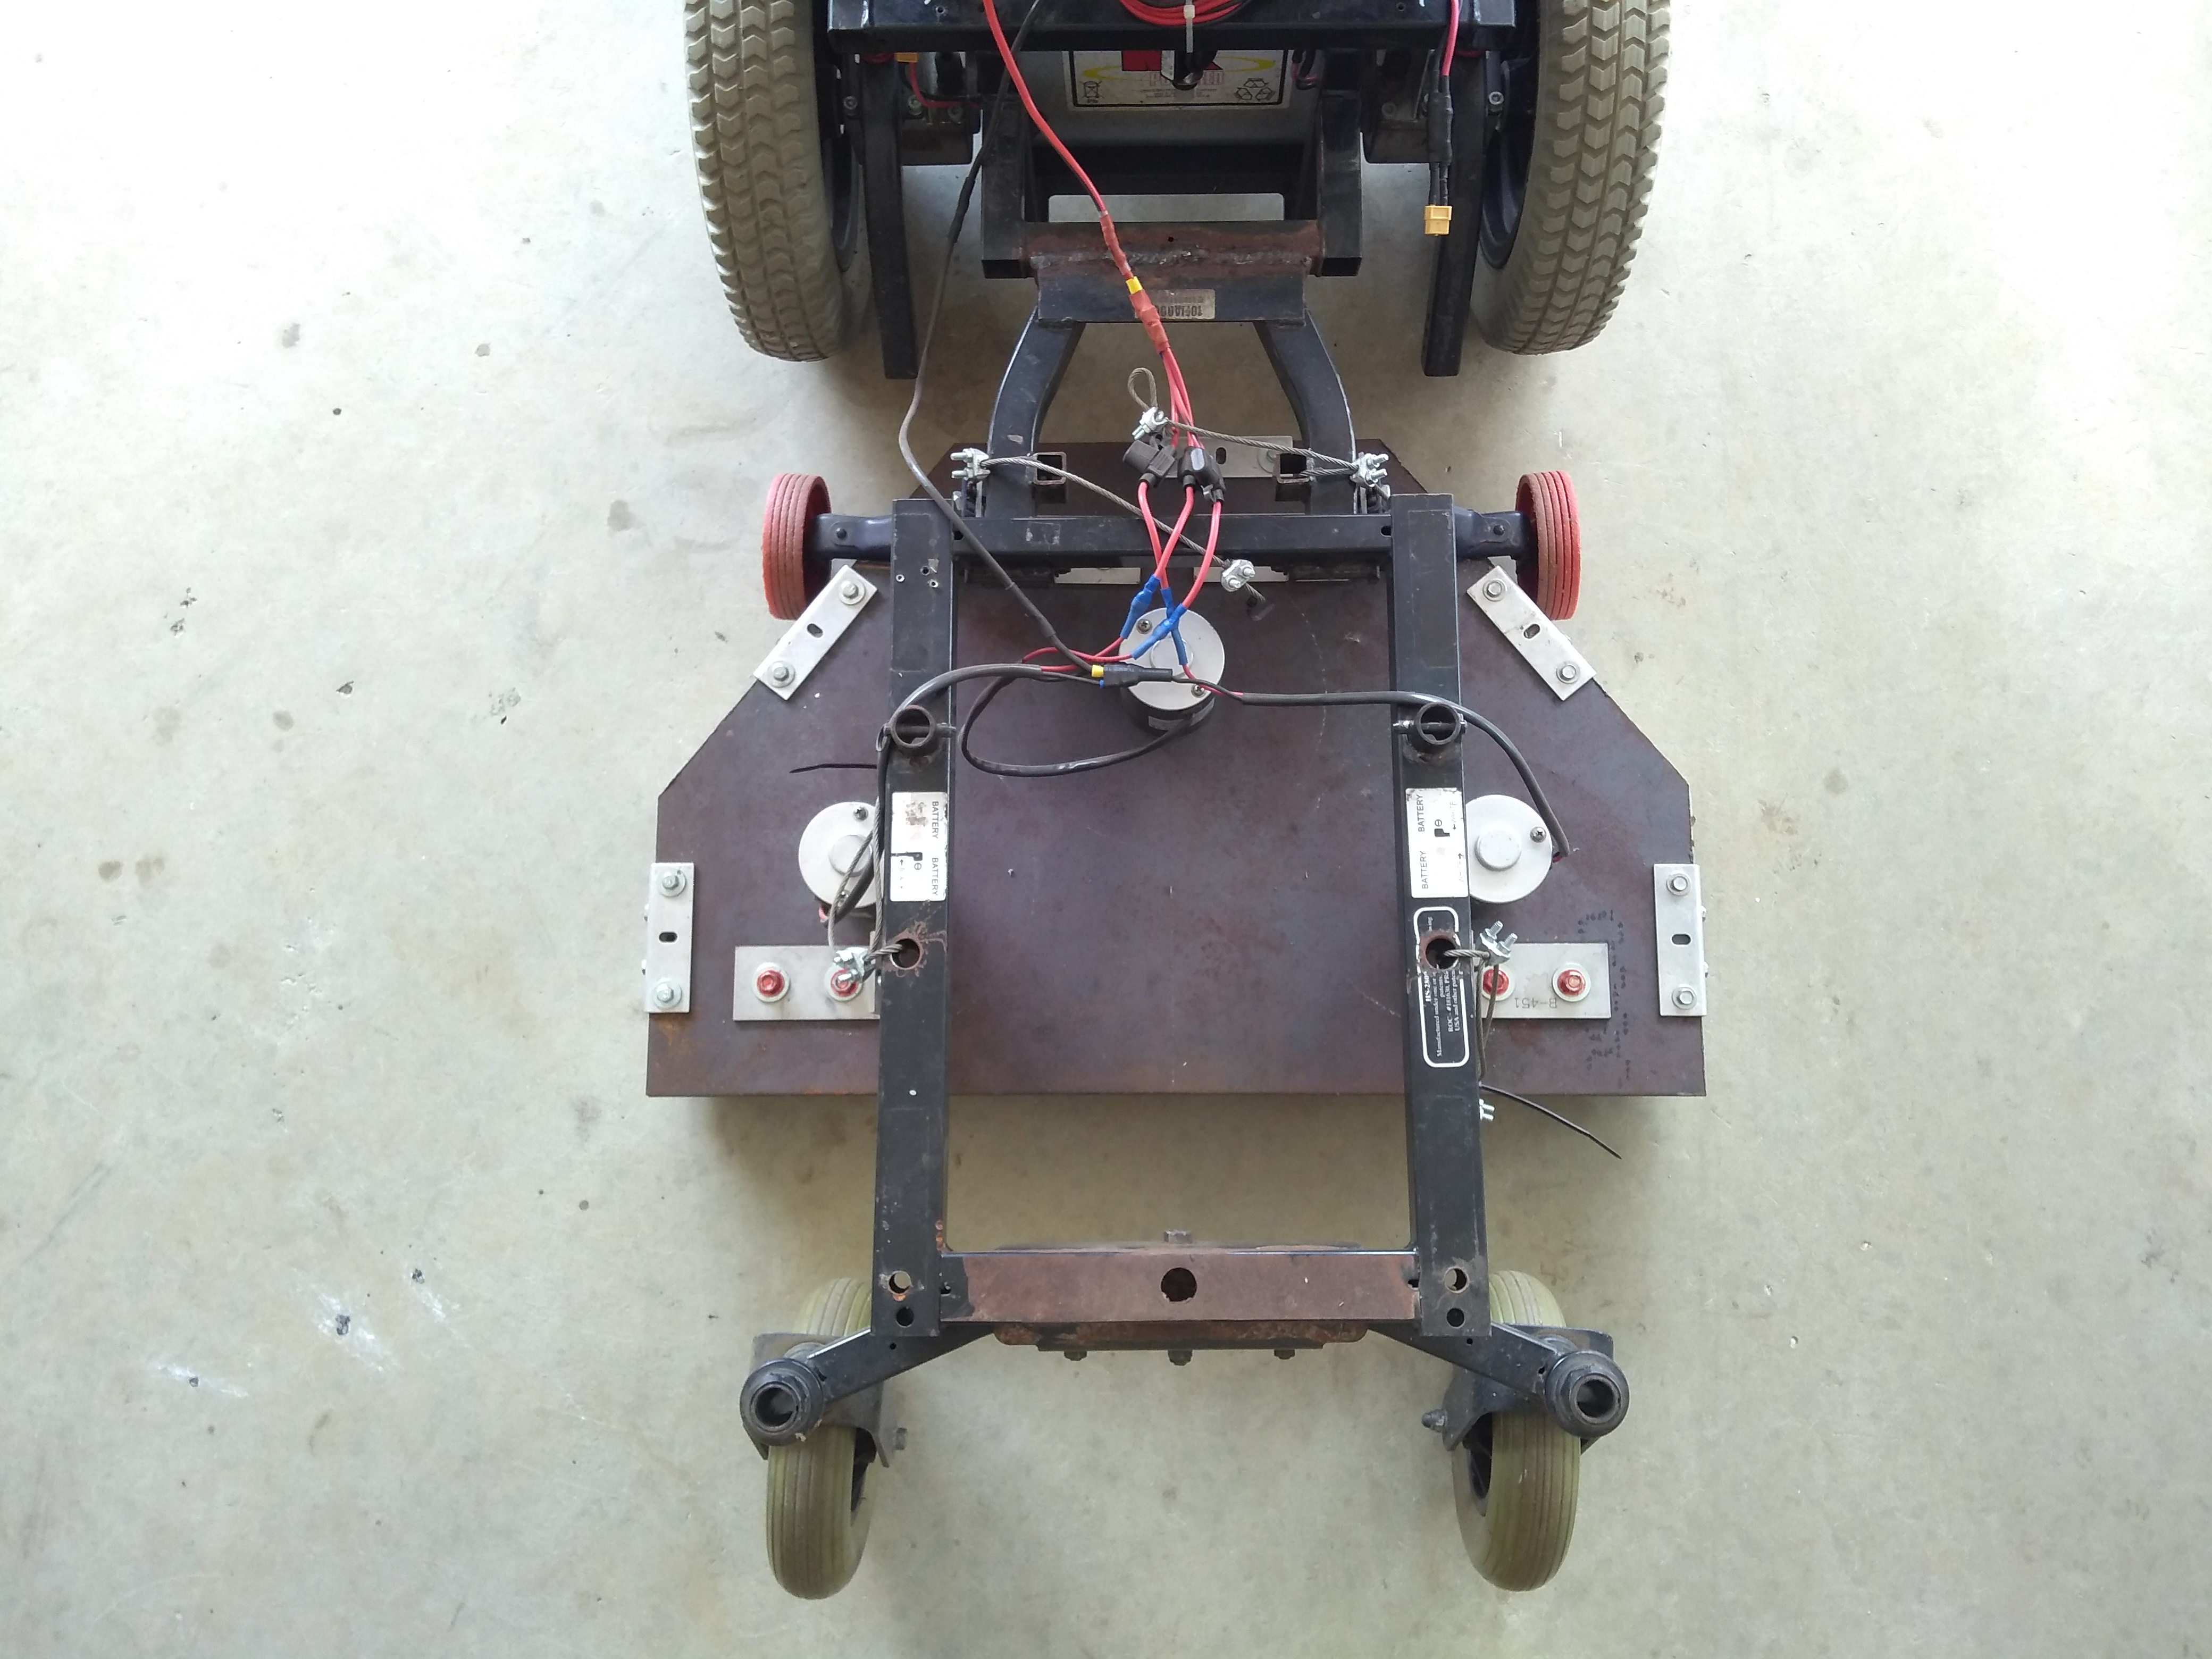
- Ask Pops to weld together a carriage structure to attach to the rover. If you study carefully the metal and swiveling wheels on this structure you may recognize they’re just parts we’ve salvaged that were laying round from prior power-chairs.
- Suspend the mowing deck from the carriage by 4 loops of 1/8″ galvanized 7×19 steel wire cable (this ultra-strong wire rope was leftover from building the backyard containment fence a few years back). Those aluminum brackets attached to the deck that the cables loop through were laying around the shop.
- Run ground wire and fused 24v power wires back to the mowing deck.
- Create mower deck sides by bending & cutting sections of 3″ Aluminum flat bar. Bolt aluminum sides to deck using these brackets.
- Bolt two Spiderman bicycle training wheels to front left/right sides of mowing deck — this helps the deck to “float” along without getting hung up on uneven terrain.

Wrapping Up
Let’s bring this post to a close with two time-lapse videos (one run — but video taken from 2 cameras — note that the second camera’s battery died before run completion) taken this morning.
Note the number of obstructions that would challenge an RTK system of lesser capability.
The mowing rig works quite well, keeping the back yard neatly trimmed and letting my clothes stay clean in the process.
Sincerely yours,
Roby
June 27, 2019 update — Here is my current Ardupilot Rover Pixhawk 4 param file for the rover: Pixhawk4-Rover-Params
Footnotes
- While it’s true that random-pattern electrically fenced autonomous mowers have been around for the last few decades (i.e. Husqvarna / Robomow), the advent of low-cost robust cm-level positioning will likely enable similarly-sized mowers to maintain an order of magnitude more land while discarding the pain point of installing/repairing an electronic perimeter. Additionally, the idea of autonomous-mower-as-a-service becomes much easier to imagine.
- The financially savvy readers of this blog may note that u-blox accomplishes this and more (i.e. they also play in the hot IoT cellular / Bluetooth space) while presently trading at an unusually reasonable multiple of ~14 times earnings (note, for instance, they’re quite similar in metrics to Axon (police camera / Taser manufacturer) but they trade at 1/10 the price (relative to earnings) of AAXN).
- $250 USD (as of May 2019) is the price for the official development kit (called C099-F9P) that you can pick up from Digi-Key. A handful of companies have built maker-friendly boards based on the ZED-F9P including ArduSimple, Sparkfun, Drotek, and CSG Shop. The bare chip retails for ~140 USD (as of May 2019).
- Ardupilot ZED-F9P support (as of May 2019) happens via the standard NMEA driver. In other words, the last time I tried to use the Ardupilot custom u-blox driver linked above with the ZED-F9P, it didn’t appear to be working (in contrast, that driver works wonderfully with the old u-blox NEO-M8P L1-only RTK module). To be perfectly honest I didn’t debug the u-blox driver at all (and hence of course what I’m saying here should be taken with a grain of salt) since it was easy to just enable standard NMEA position output in the ZED-F9P.
- If you’ve not yet converted your home/office network to Ubiquiti, perhaps that’s a more pressing item than anything else in this little blog post. The glittering reviews are justified — Ubiquiti really is that good.
- Readers without tolerance for the hackfulness of this mowing rig should have their spirits buoyed by Mr. MowerProject’s outstanding efforts (often accompanied by slick CAD images) in this area.
- Emlid appears poised to further their reach into the Land Surveying market via their new Reach RS2 based (ostensibly) on the u-blox F9 chips.
23 Responses
How does it avoid the trees and bushes?
Hi John — It’s running a pre-planned mission (i.e. several hundred waypoints charted out with Mission Planner).
How do you configure the Pixhawk for a ground vehicle? It was designed for drones right?
I run ArduPilot Rover firmware: http://ardupilot.org/rover/
Do you have a block diagram of how all your stuff connects
Hi John — Apologies for letting this comment slip below the radar — also apologies for not having a block diagram! If there’s anything you’d like me to clarify I’ll be glad to give it a shot.
Which engine do you use as a propeller for the vehicle?
Hi Crhistian — It’s built on an electric wheelchair base — so just the standard ~400w 24v DC brushed motors that you’ll find standard on those platforms.
Hello,
I’m trying to connect my dev kit up to my Pixhawk. To clarify:
– Are you now connecting the c099’s UART1 Tx to the Pixhawk’s GPS port?
– Did you have to change any baud settings? The default baud for serial3 is 38400
– Did you have to change any other settings to make it work with ardupilot?
I’m not getting anything on the pixhawk side. I tried PX4 as well and ran “gps status” in nsh, there are lat/lon messages, but it say GPS status not okay.
Thank you,
Monk
Hi Monk,
1 — Yes. C099 UART1 Tx –> Pixhawk GPS Rx
2 — Yes. I changed Pixhawk Serial 3 Baud to 115 (that’s what I use for basically everything).
3 — Yes. Pixhawk GPS Type == 5 (5 is for the NMEA driver — in the setup I describe in the post about configuring the ZED-F9P dev kit, we have the C099 outputting NMEA at 115k and 5Hz).
OK, on the Pixhawk side, sometimes it seems like you have to have the C099-F9P powered on BEFORE you power on the Pixhawk. The easy way to pull this off is within Mission Planner — select “PREFLIGHT_REBOOT_SHUT” –> click “Do Action” (in the “Action” tab in the lower left hand tab group).
If you’d like to compare your ArduPilot params with mine, here’s my current param file.
–Roby
This is great. I’m wondering if you could post some more details about the mower? I’m wondering how wide the cutting path is, what kind of batteries are you using and how long does it run on a charge? Thanks!
Hi Nick — the mower is ~50cm (as I recall) — really it’s just there as a proof-of-concept for trying out new code before I run it on bigger mowers. The batteries in that rover (2 12v lead-acid batteries in series — just standard configuration stock on electric power chair) are old so they probably need recharged after a couple of hours.
Roby,
I noticed the torque is in kg/cm. Do you mean kg * cm?
Hi Robert — You are correct, the Scag automower post is updated per your guidance.
Take care,
Roby
Mr. Roby,
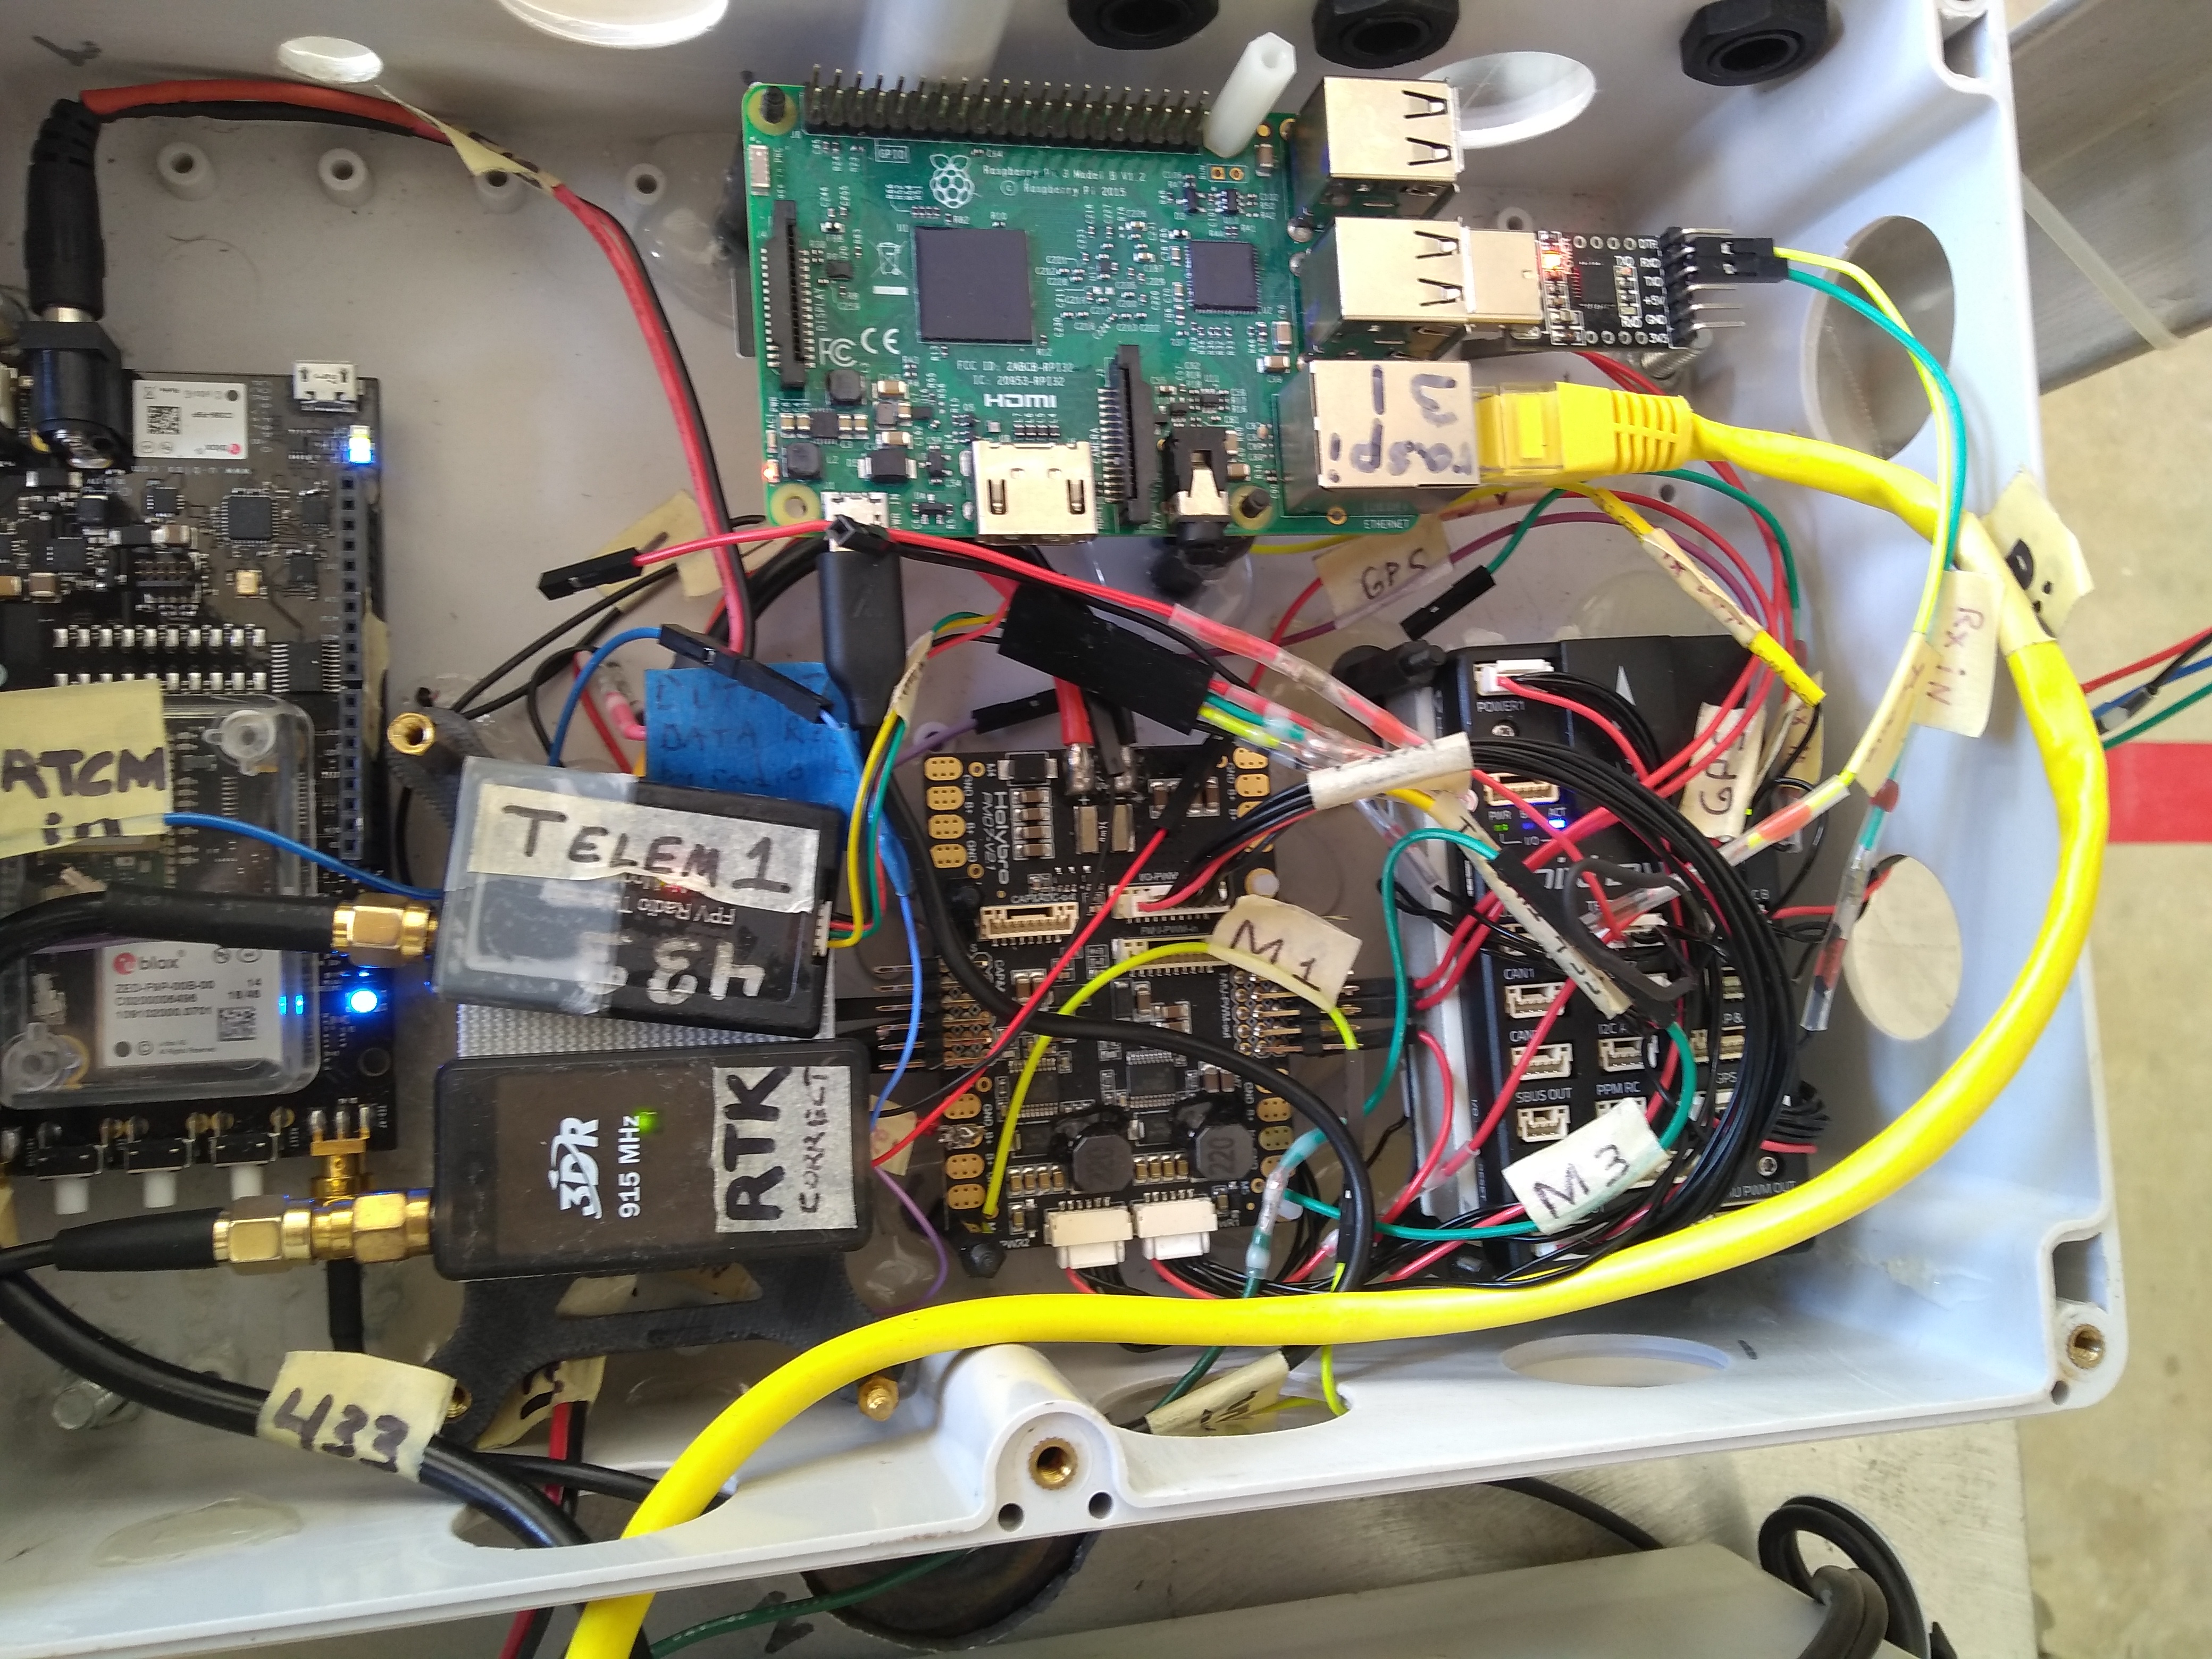
What does the PI do and what is it connected to?
Hi Robert,
The Pi serves as a general-purpose onboard computer I can log into while the robot is running around the yard.
For this build, I think the only actual function of the Pi is this: we connected one of the Pixhawk telemetry ports to the Pi (via that UART-to-USB connector you see plugged into one of the Pi’s USB sockets) and them we run MAVProxy to forward that telemetry info (as UDP) to a port on our network. If you’re familiar with Mission Planner, you can then connect to this telemetry stream by specifying whatever port # you’re sending the data to.
Another thing is that the Pi’s camera is slick and cheap — so you’ll notice the GoPro camera case mounted on the middle shelf of the structure — there’s just a Pi camera in there that we hot-glued in. So if I’m in the living room and I want to see the FPV of the robot, then I can hit the Pi’s camera stream.
Note that the Pi’s ethernet is connected to the Ubiquiti Unifi router’s ethernet port — I like using the Ubiquiti network connection (instead of the Pi’s onboard wifi radio) because it’s much more robust.
One other thing, just to be clear — when the robot is running around, you can connect to the Pi either by ssh (the Pi is on the local network via the Ubiquiti connection), or via VNC (I use a Mac and VNC Viewer which performs quite nicely).
Hopefully that info helps out a little 🙂
Take care,
Roby
Mr. Roby,
Thank you so much for making this blog and youtube videos. I will be a recent grad in Mechanical Engineering but do not feel fulfilled with only learning this field of engineering, so I am diving into a project utilizing computer engineering skills. Your information here has taught me so much and I am very grateful.
I am currently making my own revision to your Rover 2. I really liked that you utilized the rotating disc with centrifugal blades. I am making a model in Fusion360 and attempting to make a layout before I start fabrication. I cannot find the part dimensions for the mower disc.
Do you know a rough estimate for the OD of the disk?
Thank you!
Hi David,
I’m glad that you’re following your passion! Years ago I got a Software Engineering degree, but honestly never was all that excited about software ’till I got into robotics and started writing software for these robots. So, the more you dabble in robotics, the slick thing will be that your ME background will give you insights into that part of robotics that simply aren’t obvious to the rest of us who didn’t spend that much time learning ME.
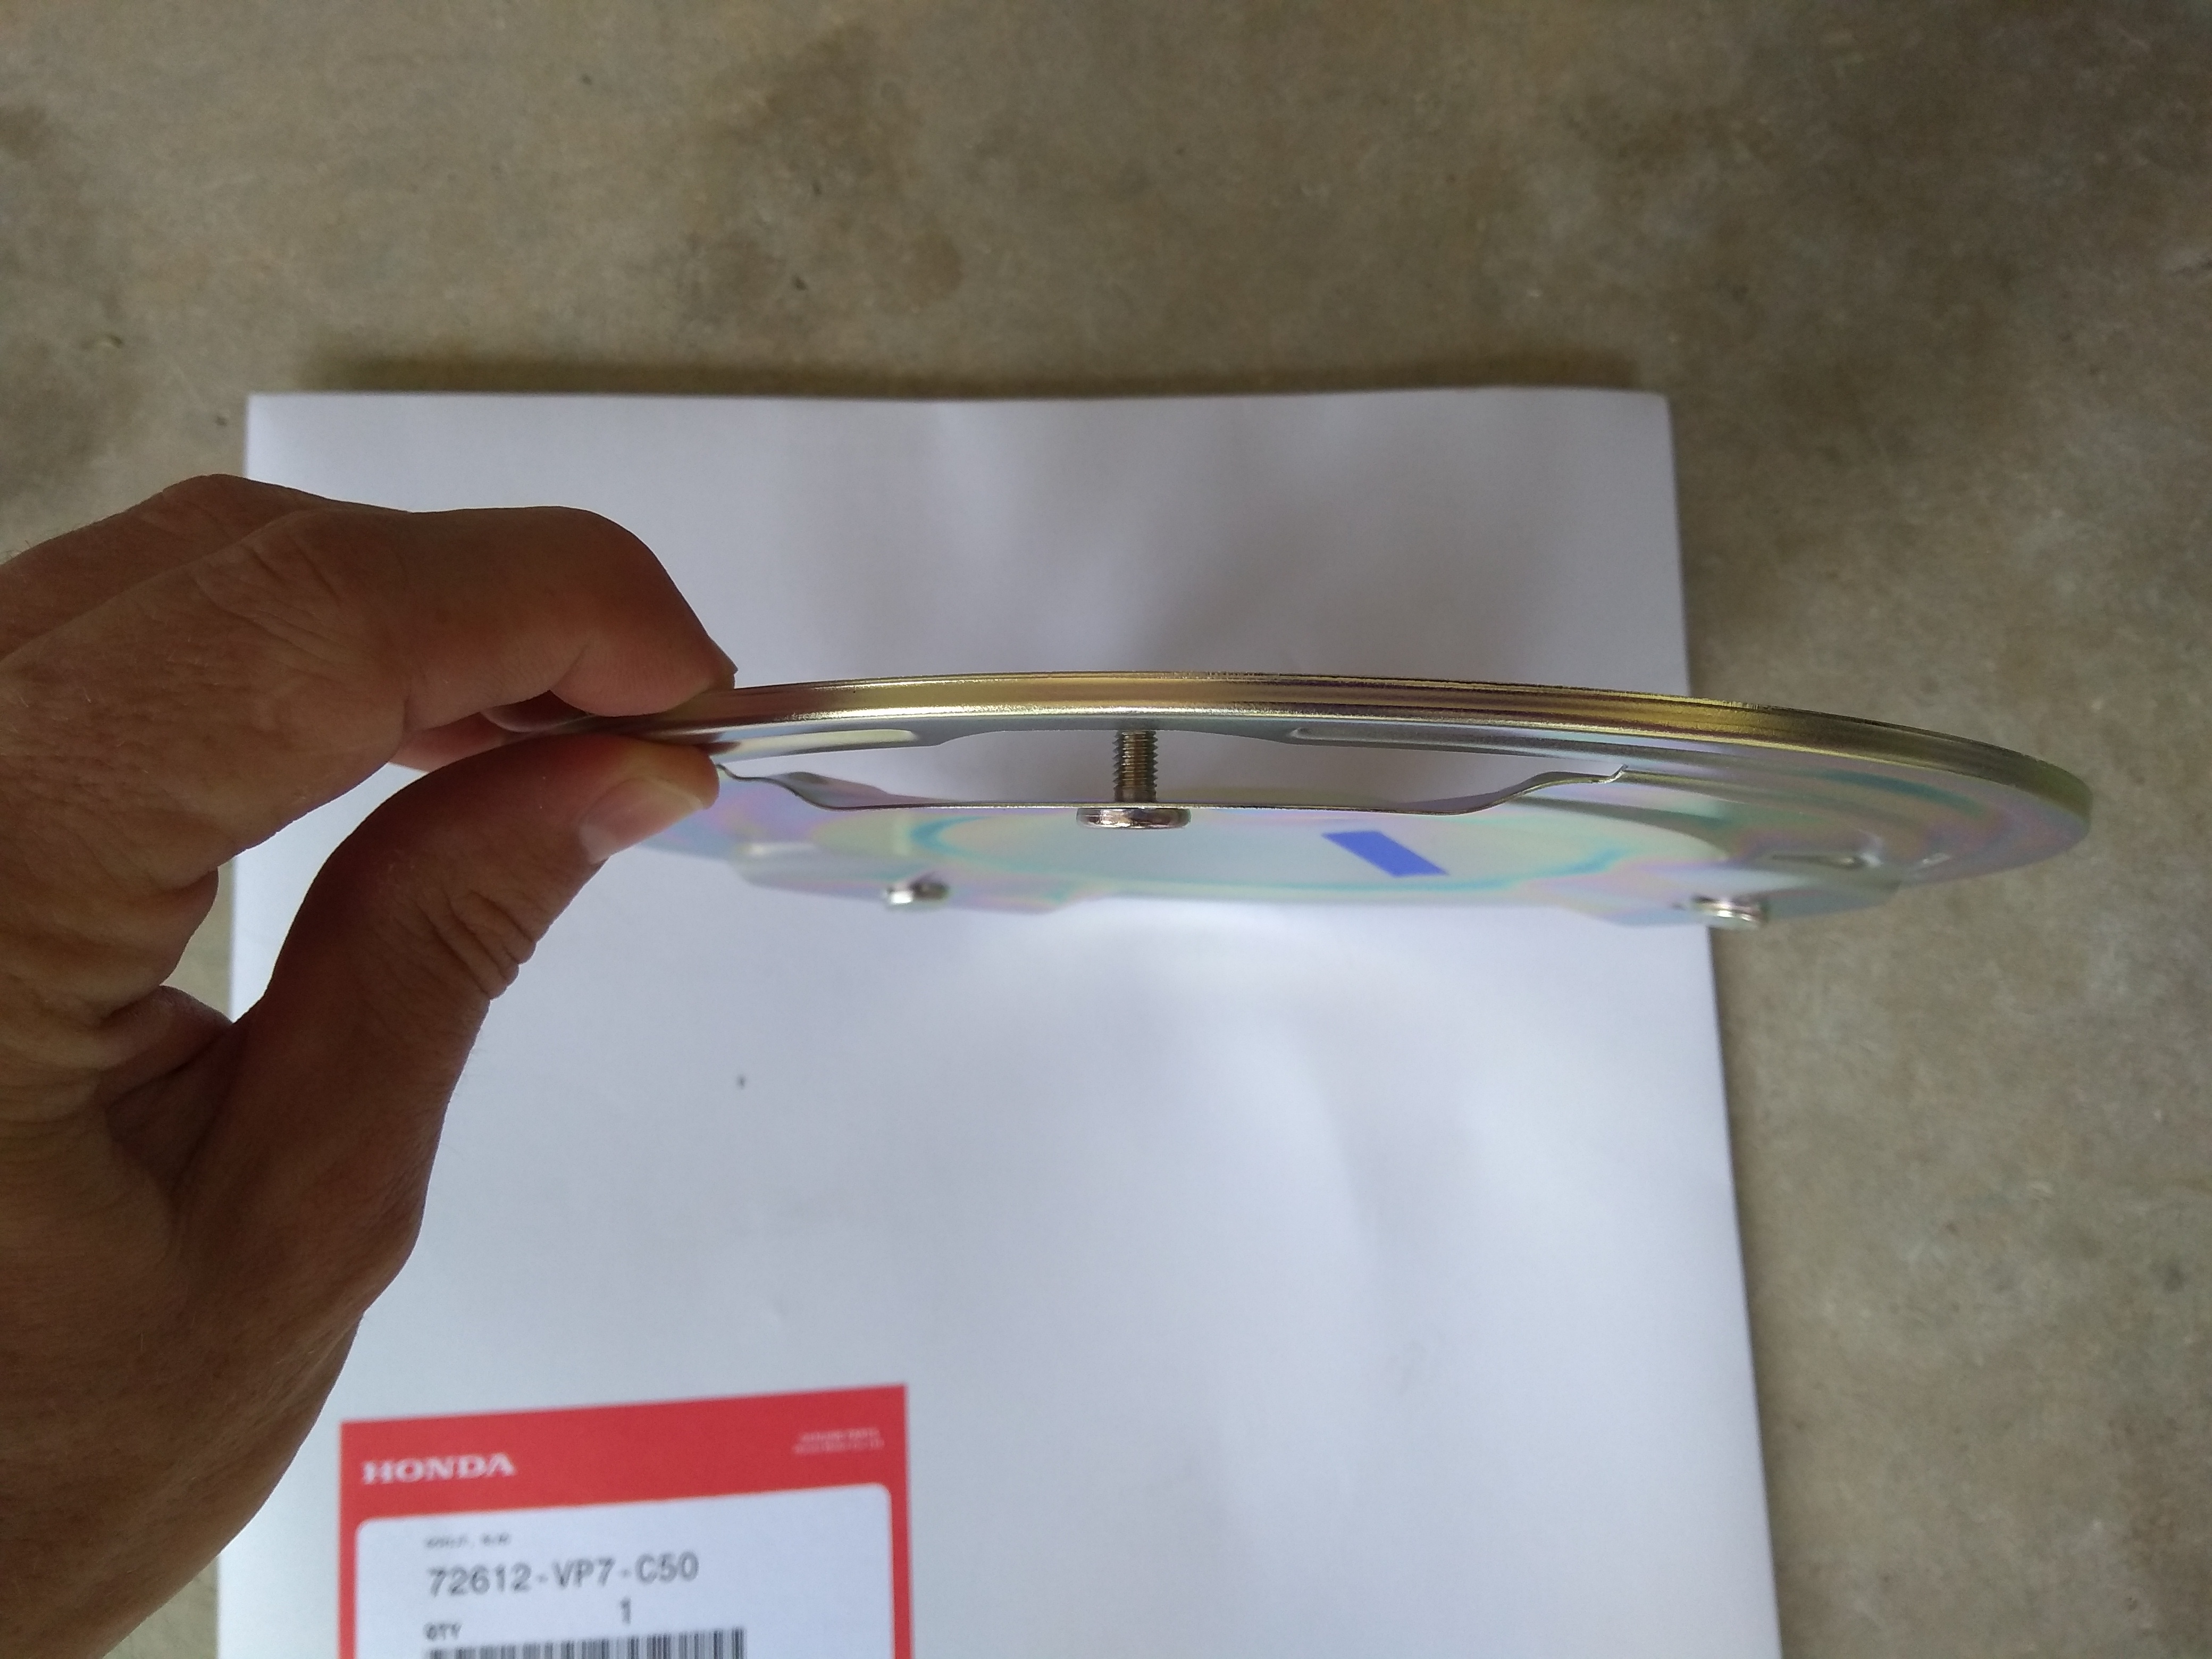
Now, to your question about the size of the Honda disk — you’re looking at approximately 11.1 cm diameter from the center of the disk to the end of the blade.
Here’s a pic:

Glad to hear from you and look forward to hearing about your progress.
Take care,
Roby
How did you find the performance of the ZED RTK as it drove under trees and such? Have flown these on drones a fair bit and curious how they performed on the ground.
Hi James — If you’re under a solid covering of dense trees you might notice it jumping out to Float — that said it’s performance in obstructed environments is remarkable, IMO.
Take care,
Roby
Any recommendations on the rover gps antenna? And maybe some comments on performance of the antenna. I am running a test mule with Pixhawk4 and ublox, but rarely get RTK Fixed. My correction signal is from the state system, so I don’t think that is the problem.
Hi Geo — The u-blox L1/L2 antenna with a 10cm metal ground plane should perform quite well. I’ve used several “cheap” antennas (i.e. TopGNSS) with the ZED and they work well. Of course Harxon antennas are great.
If you’re not getting an RTK Fix then something is wrong. I’d say splurge for your own ZED-F9P base station and see if that turns out to be the magic sauce.
Take care,
Roby
Hi Roby
I am looking into GNSS modules at the moment. You have some great information here.
How do you find the performance of the ZED-F9P compared to the ComNav K501g or K706? Especially accuracy and performance in conditions with multi-path reflections. Can you rely on the accuracy estimate given by the ZED-F9P module?